April 2018
This page was so awesome, it had to be featured on the main page!
If you have never edited on Wikipedia, Wikia, or raw MediaWiki before, the system as a whole might be intimidating. You might not know how to use the editing interface, or how to even edit anything to begin with. And then there's a bunch of different buttons like "History", and "More" with even more buttons in its dropdown menu. And then there might even be "Edit" and "Edit Source" buttons; what's the difference? And then if you do edit a page, there's even more functions inside that might not make immediate sense. All of these questions and more will be answered in this guide, and by the end of it you should be able to successfully edit a page on the wiki in your preferred interface! Please note that this guide will not go into detail on text formatting tools, if you want to learn more about those please take a look at the formatting guide.
With that, let's dive into it!
Contents
Top Button Overview

No matter what page of the Wiki you look at, it might look something like the above image. There will be large text near the top left corner with the name of the page, and across from it is a search bar. This search bar can also be seen on the forums, and it even has two separate "in wiki" and "in forums" options. Below the title text, which says "Home" here, you will see two links: one that says "Page", and another that says "Discussion". Across from those are even more buttons, some of which aren't represented in this picture. "View", "View Source", "History", "Edit", "Edit Source", and "More" are all different things you might see. But what do any of those mean? Let's take a look right now.
Left Buttons
PAGE
The "Page" button is probably the simplest button on the entire wiki. If you were to click this, your page would probably reload but otherwise nothing would happen. This is because the "Page" button simply takes you to the exact page you're currently looking at. This button might alternatively read as "Template", "User page", or anything else. This has to do with namespaces, which we cover later, but ultimately they all do the same thing. It might seem redundant, but it makes more sense when we delve into the "Discussion" button.
DISCUSSION
The "Discussion" button, located just to the right of "Page", will take you to a completely new page when clicked. The page it takes you to is designed to be used as a "discussion" page. Or, in more common terms, a comments section. At least, it's MediaWiki's equivalent of a comments section. Any member can edit a discussion, and it's meant to be used as a way to leave a comment, suggestion, or question about a specific page.
This is where the "Page" button comes in. When you are done viewing the discussion page, and want to return to the normal page, you can now click "Page" and return to the main view. Simple!
Right Buttons
The buttons near the top right of your screen, just below the search bar are more important to the overall function of the Wiki. These are the buttons you use to edit a page, view its edit history, delete it, rename it, etc. However, depending on what page you're looking at, or what settings you have set, these buttons might look completely different than they do in the above picture. Below are some different things you might see:
1)
2)
3)
4)
There are multiple reasons why there are so many different things you might see. If a page hasn't been created yet, then you will more than likely see picture #2. If a page has been protected so that only admins can edit it, then you will probably see #1. If you see #3, then you probably have the VisualEditor extension enabled, which we will go into later. #4 is the same as #3, but without VisualEditor enabled. If you intend to edit on the Wiki frequently, or are in the "Wiki Editor" group, then #3 or #4 are probably what you will see most often, depending on your settings. But what do each of these buttons actually do? Let's see.
VIEW
The "View" button is the simplest and most common button no matter what setup you have. It effectively acts the same way as "Page" in that it takes you to the default view of your current page. If you are viewing a pages history, and want to go back to the actual page, then you can click the "View" button to return, rather than hitting back.
VIEW SOURCE
"View Source" is a button that will only appear on pages you do not have permission to edit. For this Wiki, that usually means navigation pages, or pages containing official Clan/Guild information. If you click "View Source" you will be taken to an edit menu where you can view all of the pages source text and formatting. This is especially useful if you want to see how someone did something. You just can't make any changes to it.
EDIT
The "Edit" button is perhaps the most commonly used out of any button on the wiki. As it's name suggests, this is the button you click when you want to edit the text of a pre-existing page. Later in this guide we will go over navigating the edit menus.
EDIT SOURCE
This is a button that only appears if you have the VisualEditor installed, and only if you are allowed to edit a page. By clicking this button it will take you to an edit window where you will be able to view the page's raw code and formatting, rather than VisualEditor's pre-generated formatting. It is useful for more complex editing with VisualEditor.
CREATE
If you find yourself on a page where there is a "Create" button, then it means the page doesn't exist and you have to create it. Typically you won't need to worry about this, because usually when you create a new page it automatically pulls up an edit window for you, so you don't need to press "Create". In the event that you do not have an edit box on a new page, though, clicking "create" will take you to it.
HISTORY
The "History" button will take you to a new page that is often tricky for even experienced Wiki users to navigate. This page keeps a record of every single edit made to a page, and allows you to view old versions or revert to them. This is mostly used as an admin tool to undo page griefing, or to see when a particular edit was made. Casual editors do not have to worry about this button.
MORE
The "More" button, when clicked, will open a dropdown menu that has a number of additional options, most of which are meant for admin use only. But for the sake of covering them, they are:
DELETE
This is a fairly self explanatory button. Clicking it will redirect you to a new page where you can delete the page you were just on. There are additional, optional, features to specify why a page was deleted, mostly for administrative purposes. Unless you are on the Wiki staff, you will likely never see this button.
MOVE
The name of this button can be misleading, but the "Move" button is essentially a "Rename" button. Clicking it will open up a form where you can change it's name or namespace(more on namespaces below), specify a reason, create a redirect, and so on. Much like the delete button, you will likely never see this unless you are on the Wiki staff.
PROTECT/CHANGE PROTECTION
"Protect" and "Change Protection" are two different names for the same button. The difference between them is "Protect" only appears on a page that has not been protected, and "Change Protection" appears on a page that has. Clicking either button will take you to a form where you can add Admin or Editor protections to a page, if it shouldn't be editable by the Membership-at-Large. An issue of the Magazine, for example, should only be editable by the Editors. Only members of the Wiki Staff will see these buttons.
WATCH/UNWATCH
The "Watch" and "Unwatch" buttons will either add or remove a given page to your own personal Watchlist, which is a page that keeps track of every page you've chosen to watch and tells you when changes have been made to it.
If you've used clanquest.org since the design overhaul, you've probably noticed the dropdown menu in the top right corner, which looks something like this:
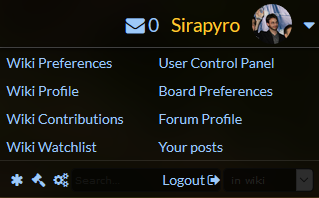
WIKI PREFERENCES
Clicking this button will take you to the settings menu for the Wiki. This will be covered more in depth later on in this guide.
WIKI PROFILE
This is a simple button that will take you to your own personal userpage, which is yours to edit and create as you like. This can be accessed from anywhere on the site, making it fairly convenient. If you would like more information on creating your userpage, see the Userpage guide.
WIKI CONTRIBUTIONS
This button will take you to a page where you can view a list of every contribution you specifically have made to the Wiki, much like the "My posts" section of our forums. They are dated in reverse chronological order, and what you see can be further filtered by date, size of edit, and so on. The contributions page will not be covered in depth in this guide.
WIKI WATCHLIST
This button will take you to your Watchlist, which was mentioned above, from anywhere on the site. Here you can see a list of every page you have chosen to "Watch", and every time they are updated your Watchlist will update to show pages as having been recently modified.
Overview of WikiEditor vs VisualEditor
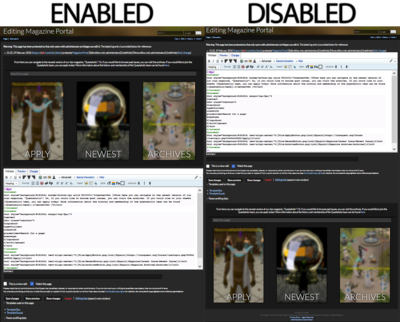
One of the most important, and perhaps confusing, parts of using the Wiki is you edit menu. On our Wiki, we have two completely different modes available for you to use: "WikiEditor" and "VisualEditor". We will go in depth on both of these, what they can, and how you use them later in this guide, but it is important that you understand the basic differences between them.
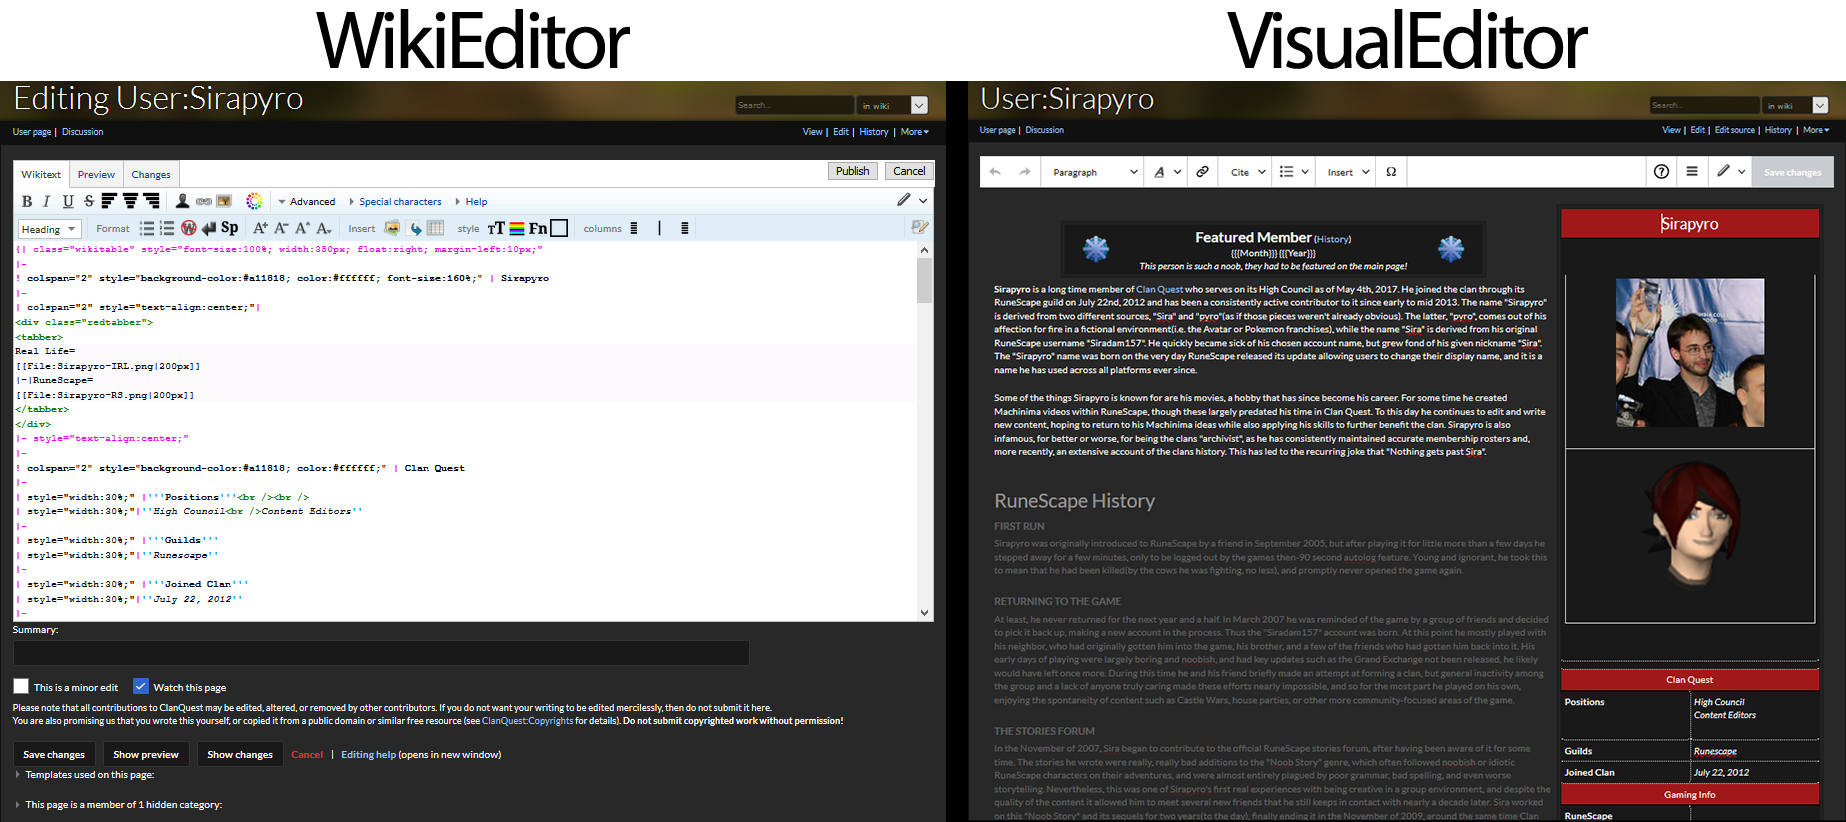
As can be seen above, the "WikiEditor" interface ans the "VisualEditor" interface are completely different from one another. WikiEditor allows you to edit the raw code of a page, much like posting on our forums. VisualEditor, on the other hand, automatically generates all formatting you do for a page's text as you edit. If, for example, you italicize text on WikiEditor, you will see it as "<i>something like this</i>", but if you italicize text on VisualEditor then you will automatically see the text as italics, like this. There are pros and cons to each Editor, and if you intend to use the Wiki frequently you might find yourself switching between them.
- More customizable
- Allows for more complex formatting
- Provides more information/statistics about a page
- Harder to read/understand
- More buttons unrelated to formatting
- Requires regular "previewing" to see what you're doing
- Easier to understand
- Can visualize changes you're making on the fly
- Pre-renders templates and tables for easier use
- Slower to load/laggier
- Less customizable
- Creates more buttons across all pages
There are a lot more reasons why you might want to use one over the other, but you will typically learn what those are through experience. As a general rule of thumb: VisualEditor is easier to use for beginners, but if you want to do more complex and interesting formatting then you should switch to WikiEditor. Switching between these two editors is very easy, as well, no matter what settings you have enabled. On both toolbars you will see an icon near the top right corner that looks something this this:
If you click this button then you will be given an option to switch between "Source Editing"(AKA WikiEditor) and "Visual Editing"(AKA VisualEditor). You will be able to use this option no matter what your settings are, but read on if you want to learn more about how to change your Wiki settings and, consequentially, set your default editor.
Wiki Preferences
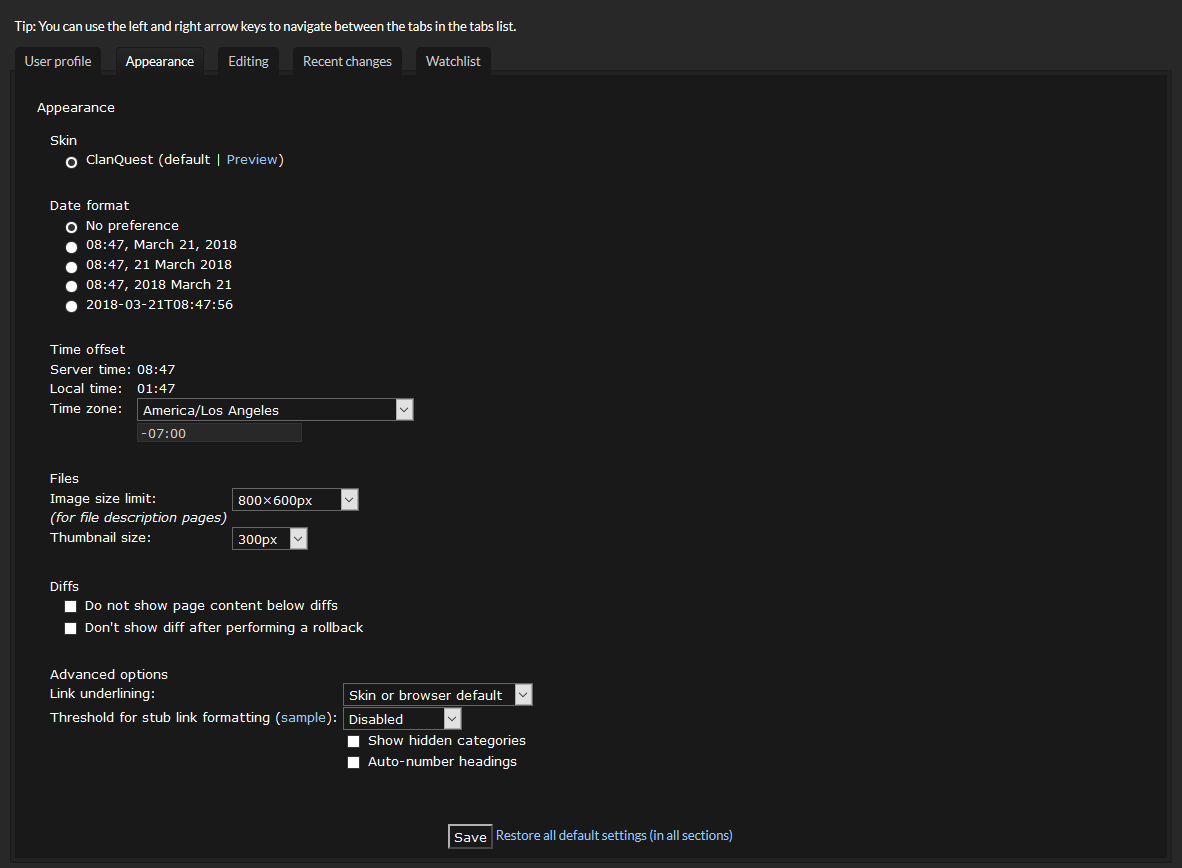
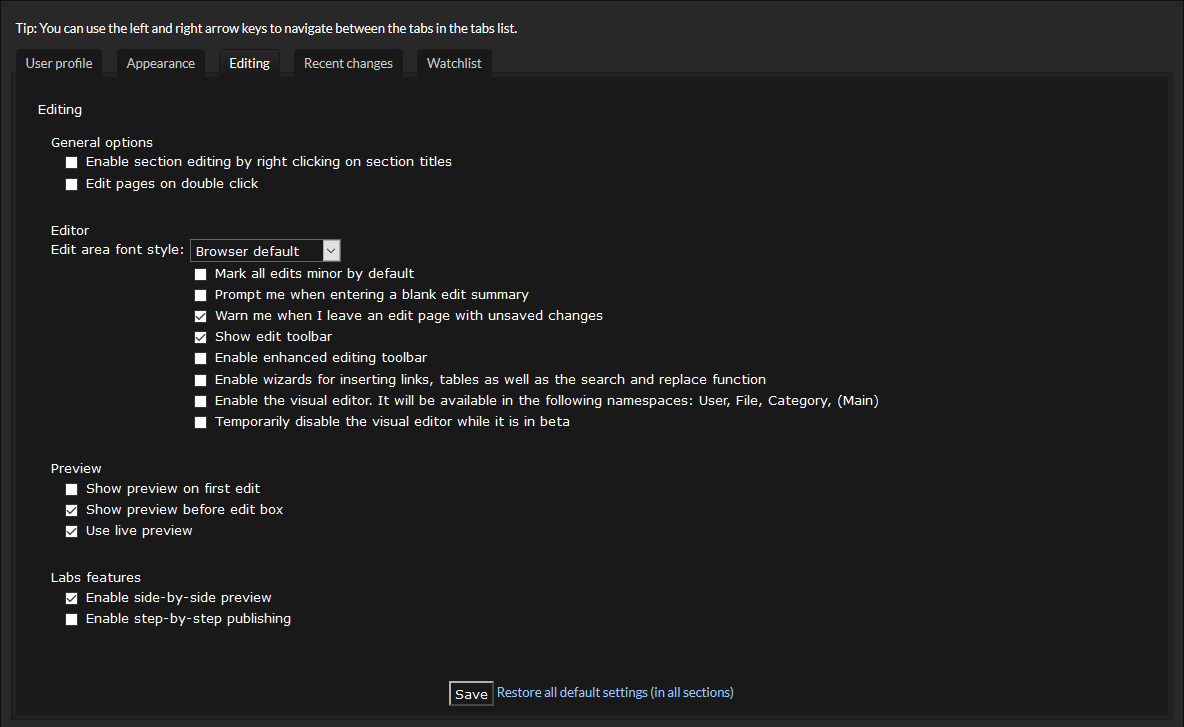
It's important to run through the settings when you're getting set up on a new site. There's a lot of personal preferences you might have about how the site looks, or how you interact with certain functions on the site, like edit windows or the localized time. You can view the settings for the Wiki, referred to as "Wiki Preferences", by either clicking this link, or by clicking the link in your drop down menu in the top right corner of the website. You might be intimidated by or lost in all of the different options, but fear not as they are described below.
Due to the length and size of the images in this section, they have been hidden under spoilers. Simply click the "Expand" button to view the relevant text.
User Profile
| User Profile |
|---|
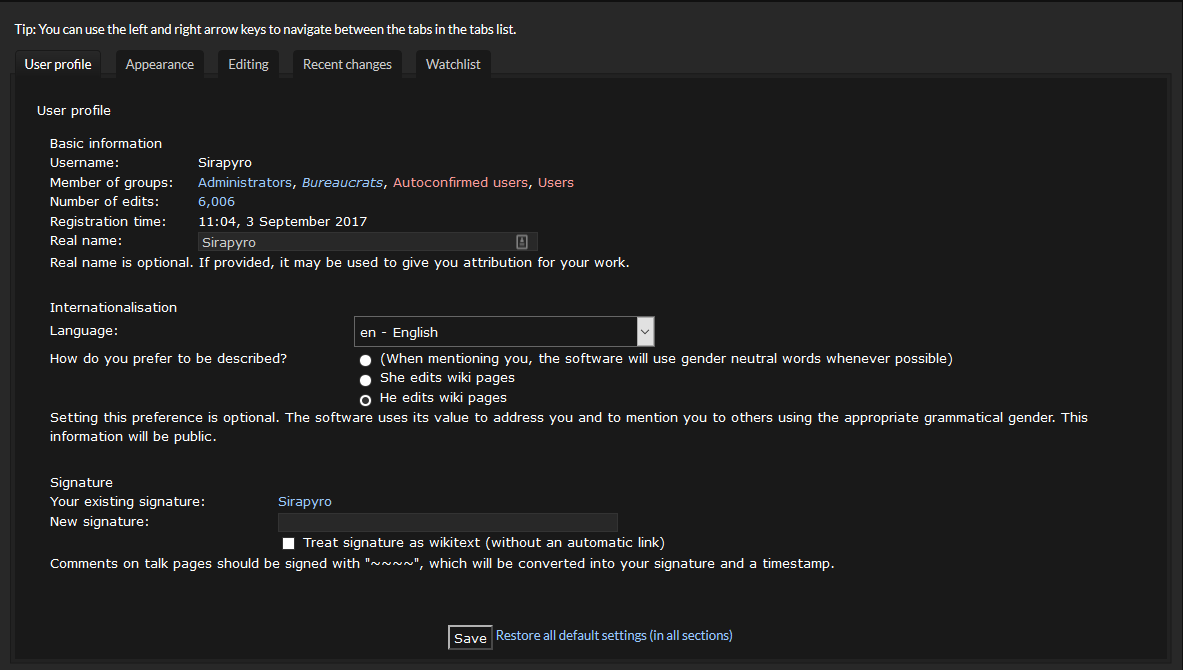 By default, you will always end up on the "User Profile" tab when you initially open your settings. This is a very simple tab that only controls a few different options: Your name, your language, your preferred pronoun, and your signature. There are a few statistics on this page as well, including number of edits and usergroups, but these cannot be changed from here. |
Appearance
Editing
Recent Changes
| Recent Changes |
|---|
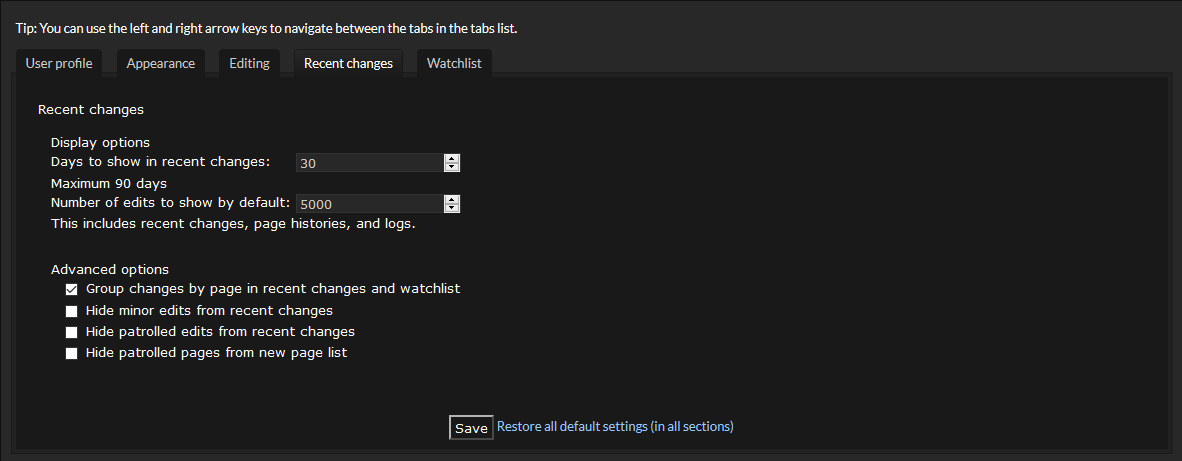 This is a very simple section in the Preferences menu, as it only deals with the Recent Changes page. The Recent Changes page literally does just that: shows all recent changes, made by all members across the entire Wiki. There are only a couple of settings here, and they're not incredibly complicated. DISPLAY OPTIONS ADVANCED OPTIONS |
Watchlist
| Watchlist |
|---|
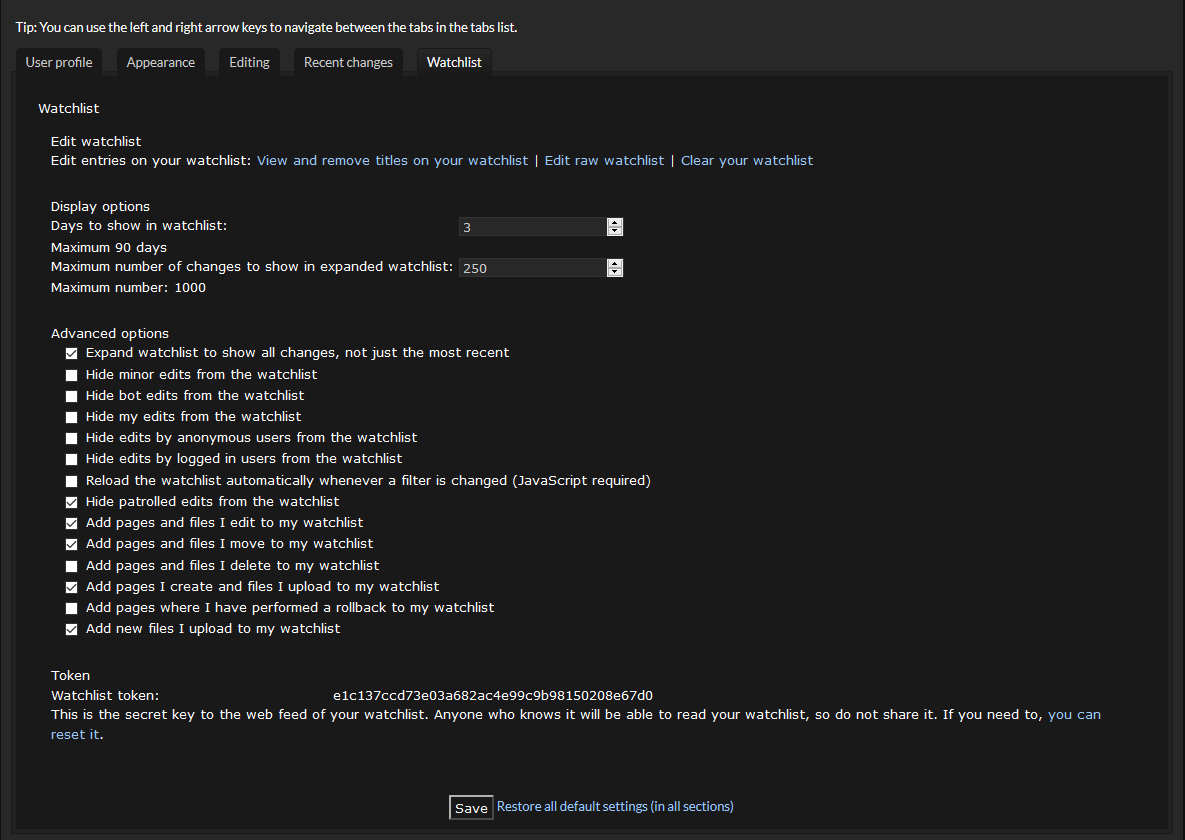 The settings on this page manage how your own personal Watchlist functions. This guide will not go into great detail on all of these settings, you can play around with them yourself, but if you take a look at two settings near the top, you will find that they are very similar to the "Recent Changes" settings. The rest of the settings on this page are check boxes that you can explore on your own. They are fairly straight forward, and primarily handle what type of pages you see on your watchlist, and what pages are added to your watchlist. You can, for example, hide minor edits, or edits you have made yourself from showing up. Additionally, you can change your settings so that every page you edit or create is automatically added. Play around with these if you intend to use the Watchlist function of the Wiki. |
Understanding Namespaces
There is a term that has been used a few times in this guide, "Namespace", that is important to know when working on Wiki's regularly. In simple terms, a namespace is a piece of text the precede's a pages title. For example, if you were to visit the userpage of Sirapyro and looked at the title of the page in the top left corner, you might notice that it does not say "Sirapyro".

Instead, it says "User:Sirapyro", because it is in the "User:" namespace. Now, if you were to take a look at the "All Pages" directory, you would notice that "User:Sirapyro" is nowhere to be found. This is because every page on the Wiki is organized into a different namespace that can be used to categorize that page. There are several different namespaces on our Wiki, which can be easily viewed on that All Pages directory by clicking the "Namespace" dropdown:
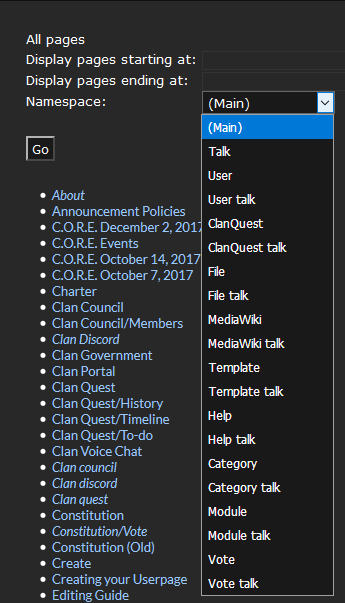
That list is about as accurate a list of namespaces as you are ever going to get. By default, every single page on the Wiki is added to the "(Main)" namespace, which does not actually appear in front of any of its page titles. Others such as "user", "template", "help", "vote", or "ClanQuest" will always be prefaced with the corresponding namespace title. For the most part, you will never have to worry about specifying a namespace as userpages are automatically added to "User:", and everything else is automatically added to "(Main)". The only instance in which a casual user would need to specify a namespace is if the wanted to create a new template, which will not be covered in this guide. Still, it is important to have a basic understanding of namespaces as they are mentioned throughout this guide. A basic description of all our Wiki's namespaces can be found below.
(Main)
The "(Main)" namespace is invisible, and is applied to every single page where a namespace is not otherwise applied. The bulk of all pages on the Wiki fall into this namespace, as it is intended to be the primary directory for all non-administrative or code-based pages.
Talk
Earlier in this guide we went over the concept of a "discussion" page, and how every single page on the Wiki has one. Technically speaking, while a discussion page is attached to a main page, it is a completely separate web page. Basically what this means is that discussion pages fall into their own namespace, known as the "Talk" namespace. If you look at the list above, thouh, you will notice that there are several namespaces with the word "talk" in them. This is because each namespace has their own unique "talk" equivalent. The "(Main)" namespace has "Talk", the "User" namespace has "User Talk", and so on.
User
The "User" namespace is automatically applied to every single userpage, whether the person creating it knew to add it or not. It basically just tells the Wiki that this page belongs to a specific user on the site, and prevents anyone other than themselves or Wiki Administrators from making changes to it.
ClanQuest
This is a namespace that essentially serves as a less important counter to the "MediaWiki" namespace, and the pages in this namespace are usually about the function of the Wiki. As of now, the only pages here are Legal and Privacy information, as well as information about the usergroups. These are automatically generated, and so this namespace should not be used by anyone other than the Wiki Administrators.
File
Any time an image is uploaded to the Wiki, it is automatically added to the "File" namespace, which is required for it to be displayed as an image. When adding a file to a page, it will look something like this: "[[File:exactfilename.extension]]". Two things are important to know here:
1) A file name AND its extension(.png, .jpg, etc.) must be spelled perfectly in order to work, and they are case sensitive.
2) Due to server space restrictions, only Wiki Administrators are allowed to upload images to the Wiki. If you would like to add images to your page, please host them on an external site such as Imgur.
MediaWiki
This is an important, administrative level namespace used to manage certain parts of the Wiki, such as usergroups and javascript or css code. Non-administrators do not need to worry about pages in this namespace.
Template
The "Template" namespace allows pages to be used as "Templates", which are extremely powerful tools unique to the Wiki. Basically, any user can create a "Template" that contains a lot of complex code and formatting that ends up looking like an incredibly well organized infobox. This code might be too complex or confusing for many members to understand, but if this code is placed onto a page in the "Template" namespace, then it can be added and automatically generated on any other page in the Wiki without worrying about all the complicated code. For example, there is a template on this Wiki called "Userbox" that generates an infobox with all sorts of personal information, designed to be used on userpages. More information on that can be found here, but if a user were to simply write down the text "{{Userbox}}", then it would automatically generate a simplified version of that userbox, without all of the complicated code that was used to make it.
Help
The "Help" namespace is an automatically generated namespace that is meant to be used for helpful, MediaWiki-specific pages. We do not use it on this Wiki.
Category
Every page in the "Category" namespace will automatically convert into a Wiki category, which is a tool common to all Wiki's that let's you group similar pages into one directory. Ordinarily if you linked to a page, it would look something like this: [[pagename]]<nowiki>, but if you linked to a category it would look something like this: <nowiki>[[Category:pagename]]. Any time you include "Category:" at the front on one of these links it will automatically convert into a category and move to the bottom of the page. Only Wiki Administrators are allowed to create new categories.
Module
The "Module" namespace is a special namespace that allows for the creation of incredibly complex templates based on LUA code rather than Wiki code. Any page in this namespace can be invoked by writing: {{#invoke:modulename}}, along with any other additional formatting options specified on the Module page. These are an extremely complex form of Wiki formatting, and will likely only ever be used by people fluent in the Wiki and with LUA. Casual users can ignore these.
Vote
The "Vote" namespace was custom created for our Wiki to contain all official Clan votes. Only Guild and Clan leaders will ever utilize this namespace.
Creating and Editing Pages
Please note that the screenshots in this section of the Guide were taken using the WikiEditor. If your screen does not look exactly the same do not worry, these same concepts will apply no matter what settings you have checked.
The core function, the core idea behind any Wiki is that anyone can create their own content, or edit existing content. Wikipedia is the single most famous example of this, and our Wiki runs on the same software. While there are many pages on this Wiki that can't be freely edited by anyone, those are largely administrative in nature. So long as you follow our editing policies, there are absolutely no limitations to what you can do on the Wiki! Create a page about everything from people to events to weird groups that worship a piece of cloth! The limit is your creativity and willingness to participate.
Keep reading through this section of the guide if you would like to know how to create a new page or edit an existing one. While this guide can't help you decide what to put on these pages, it can help you get started!
Creating a New Page
- Click on a "red link" on another page. All Wiki's work by linking to other pages, which can be done by surrounding the name of a page title with double brackets, [[like this]]. Anything inside double brackets will be turned into a Wiki link, but if the page does not exist yet then it will appear as red, like this text here, and clicking it will give you the option to create it.
- You can create a new page by typing its name into the URL. For example, the URL for this specific page is "https://clanquest.org/wiki/Editing_Guide". "Editing_Guide" is the name of the page, but you can replace that text with anything you want, and it will redirect you to that page whether it exists or not. If it doesn't exist, then you will be given the option to create it. Please note that all spaces must be written as underscores in the URL, and that links are extremely case sensitive. "Editing Guide" and "Editing guide" are two very different pages.
- Type the name of a page into the input box below and hit enter. This will automatically take you to a text box where you can create your new page.
Once you actually click a red link or type into the URL/input box, you will find yourself in one of two places. Either you will have a large, empty text box which you are able to type in, or you won't. If you do have this type box, then great! Simply type whatever it is you want your page to say and click the "Save page" button at the bottom left, which can be seen below:
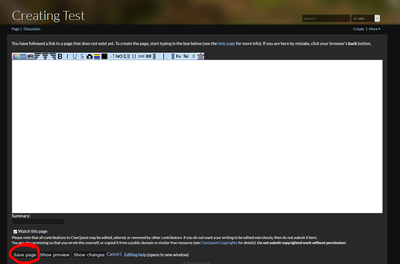
Alternatively, you can click the "Publish" button at the top right if you enabled it earlier in the Preferences section of this Guide. If you are using the VisualEditor, the "Save Changes" button will be in the top right corner rather than the bottom left.
If what you see doesn't resemble the above image, then you are likely on a page that says nothing other than "There is currently no text in this page. You can search for this page title in other pages, search the related logs, or create this page.". This is not a problem, there are actually not one, but two buttons on this page you can click that will then take you to the page you can see in the image above, and those are outlined here:

And there you have it, now you know how to create a new page! What you put in it is up to you, and as said previously if you would like more information on formatting please visit the formatting guide.
Editing an Existing Page
Editing a pre-existing page could not be simpler, and it can be done by the click of one, single, button, which can be found here:

That is truly, honestly all there is to it. Once you click that button you will find yourself with the same open text box you saw in the first image above, only this time it will already have something written in it, which you can then change.
How to Use WikiEditor
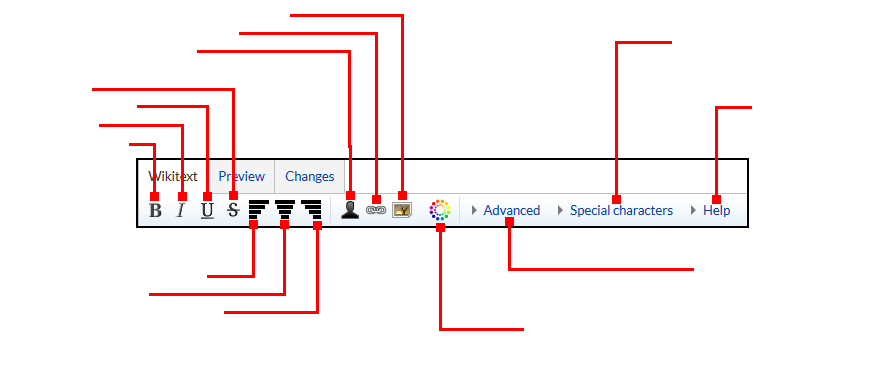
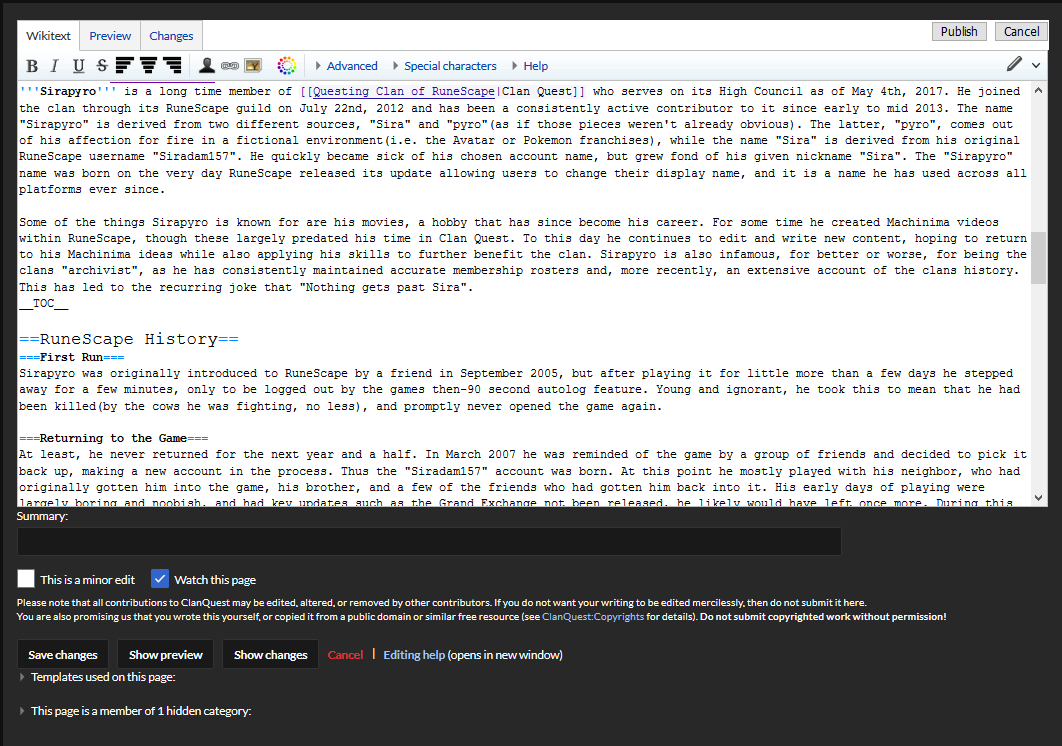
As covered earlier, WikiEditor is the more complex, but also more powerful, Wiki editing tool available for you to use. Chances are it will resemble the image below, but depending on the settings you chose after reviewing the Preferences section of this Guide, you might not see any of the buttons on the upper most row of the below image. This is fine, there are alternate buttons for them no matter what settings you have selected. In order to use the WikiEditor you must either disable the VisualEditor in the "Editing" section of your preferences, or click "Edit Source" on a page.
Major Buttons
SAVE CHANGES/PUBLISH
![]()
The "Save Changes" button(located at the bottom left) and the "Publish" button(located at the top right) both perform the same function: Confirm and save your edits. It is the Wiki equivalent of the "Submit" button on the forums.
PREVIEW/SHOW PREVIEW
![]()
The "Preview" button(at the bottom it will say "Show Preview") will allow you to see what your text will look like once you save changes. If you want to check your work without publishing your work, press the "Preview" button. The primary difference between this and VisualEditor is that VisualEditor automatically previews your changes as you edit.
CHANGES/SHOW CHANGES
![]()
The "Changes"(top) and "Show changes"(bottom) buttons do the same thing: show you the differences between what you've done and the previous edit. It is an alternative to the "History" button covered in the first section of this guide.
CANCEL
Any "Cancel" button you see while editing simply causes you to stop editing, discards all your changes, and takes you back to the page view.
THIS IS A MINOR EDIT
![]()
This check box, located just above the "Save changes" button at the bottom, will flag your changes as "minor". Flagging something as "minor" allows it to be filtered out in the recent changes list.
WATCH THIS PAGE
![]()
If you check this box, located just above the "Save changes"/"Show preview" buttons at the bottom of the page, then when you save changes it will be added to your watchlist.
Toolbar
There are four "levels" to the WikiEditor toolbar: The basics, advanced, special characters, and help. Read on to learn what each of them, and all their respective buttons, do. Some will be self explanatory, such as italicizing text, and won't need further explanation. Some, however, will be further expanded upon as needed.
BASIC
- Link to Userpage
If you highlight a piece of text, when you click this button it will surround it in the necessary coding to link to a userpage. For example, if I highlighted the text "Sirapyro" and clicked this button, it would result in "[[User:Sirapyro]]"
- Link to Regular Page
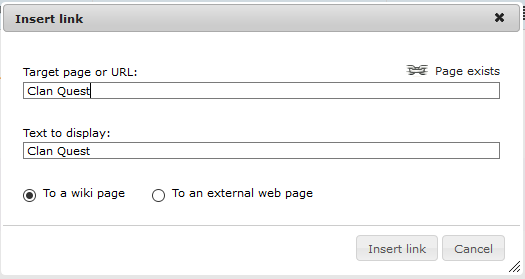
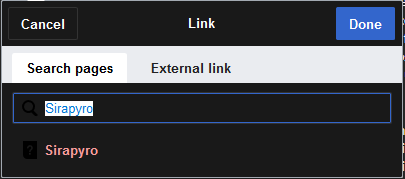
Clicking this button will surround any piece of highlighted text in double brackets, like this, which is the necessary coding in order to link to another wiki page. However, if you have the "Enable wizards" setting enabled, which we covered earlier in the "Preferences" section of this guide, then when you click this button you might see this instead:
This is an alternative tool you can use that will automatically find and insert links for you. It will even help you generate links that show different text! Additionally, you can select the "To an external web page" button to link to any websites URL.
- Link to Image on the Wiki
If you highlight a piece of text, when you click this button it will surround it in the necessary coding to link to an image/picture uploaded to this Wiki. For example, if I highlighted the text "test.png" and clicked this button, it would result in "[[File:text.png]]". Of course, this would only actually display an image if "text.png" exists. If you have the "Enable wizards" setting enabled, which we covered earlier in the "Preferences" section of this guide, then when you click this button you might see this instead:
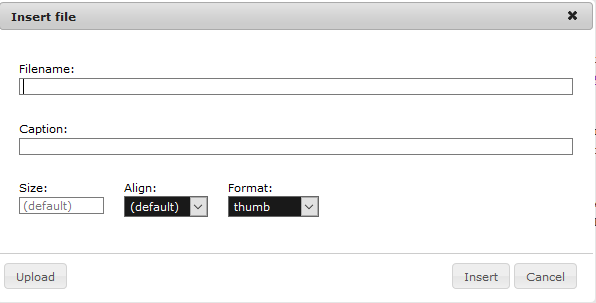
This is another wizard that helps you find the image you want and apply all additional formatting options such as captions, alignment, and so on.
- Enable/Disable Code Highlighting
This button is a toggle that allows you to turn code/syntax highlighting either on or off. "Syntax highlighting" means that when you surround a piece of text with certain code, it will appear as a different color in order to make it stand out. It is incredibly useful if you are working with a lot of wiki code, but having it enabled disables your ability to search through your text box. Additionally, with this enabled your text-edit box will be white, and therefore brighter. Disabling this will remove all syntax highlighting, reenable searching, and make your text box black/dark themed.

ADVANCED
By clicking the "Advanced" dropdown on the basic toolbar you will suddenly find yourself with a lot more options available to you. While some of these might be more self explanatory than others, we will go into them in greater detail.
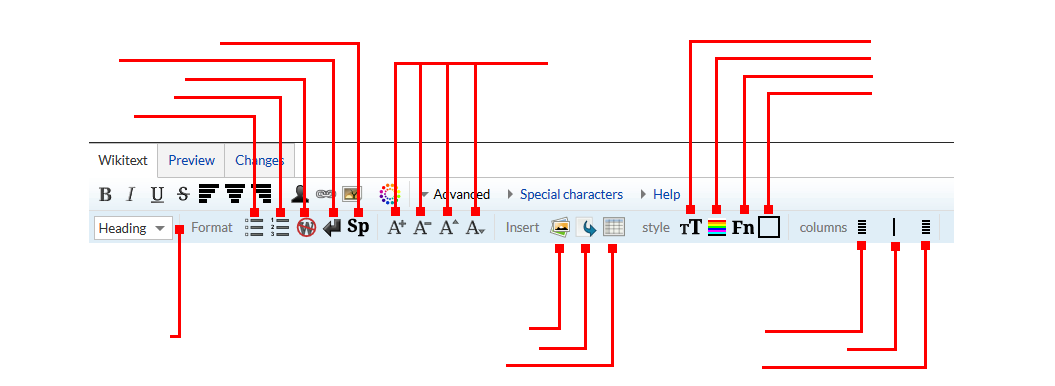
- Section Header Dropdown
The "Heading" dropdown allows you to turn highlighted text into a section title, which means it can be used as a page anchor, or edited on it own without having to edit the entire page. Think of it as a "chapter" marker on a page. They are also used to automatically generate a table of contents at the top of every page where section headings exist. There is a known issue where the dropdown will not show up if syntax highlighting is enabled.
- Bullet List
Bullet lists are really simple. As a matter of fact, you're looking at one right now. The light blue title one line above this text is preceded by a bullet point. That's pretty much all it is. Clicking this button will automatically generate the formatting needed to create a bullet point, but in reality all you need to do is write an asterisk("*") at the beginning of a new line.
- Numbered List
A numbered list is almost exactly the same as a bullet list, except it uses numbers instead of bullets. The names sort've imply that. Pressing this button will generate a new number for your list, but you can also achieve this by simply typing a number sign("#") at the beginning of a new line.
- No Formatting
The "No formatting" function on the wiki is a powerful piece of code that completely and utterly disables all formatting of anything inside it. It is more often referred to as "nowiki", as that is the actual name of the piece of code. Below there are two lines of text, one with and one without this piece of code applied.
Without: Formatting test
With: <i>Formatting test</i>
As you can see, the "<i>" tag, used to create italic text, did not trigger in the second example, because the "<nowiki>" tag disabled it.
- New line
While this is covered more in the formatting guide, the Wiki platform as a whole is a little weird when it comes to create new lines/paragraphs. If you only hit enter/return once in order to start a new paragraph, then when you press "save changes" it will act like you never pressed it at all, and generate it all as one paragraph. You must hit enter/return twice in order to start a new paragraph, but that generates a space between two lines of text that you might not want. In order to get around that you must use this button, which allows you to create a new line without creating a new paragraph.
I've just used the new line, or "<br />" code to start a new line without starting a new paragraph.
And now I've hit enter/return twice, starting a new paragraph. You can see the difference in spacing. Both have their uses, but in order to do the former you must use the "New line" button.
- Spoiler Dropdown
If you press this button with any amount of text highlighted it will put it into a "spoiler", or a box that is hidden by default and must be revealed by clicking a button. This is a feature that was built to emulate its equivalent on the forums, and while it will be covered in more detail in the formatting guide, the basic text you need to write is:{{Spoiler|name of the spoiler|text to be hidden}}
- Broken
No, this is not the actual name of these buttons. In actuality these buttons are, from left to right, "Big"(which makes text bigger), "Small"(which makes text smaller), "Sup"(which superscripts text), and "Sub"(which subscripts text). Unfortunately, all four are currently broken, but are default buttons on the WikiEditor toolbar so they have been left. You can ignore these until they are fixed at some point in the future.
- Generate Gallery
Clicking this button will surrond all text in a "<gallery>" tag, <gallery>much like this</gallery>. This tag is meant to be used with a list of images rather than regular text though, and is capable of generating more advanced formatting options for a large number of pictures. Unfortunately it is not working properly at this time, and so we will not go into it in great detail.
- Generate Redirect
This is a button that you might never have a use for, but it has a place on the toolbar regardless. Basically, this button generates the code needed for you to turn a page into a "Redirect". When a page is a "Redirect", any time it is linked to it will instead send someone to the page you indicated when you set the redirect up. This guide is an excellent example of a redirect! As mentioned earlier in this guide, page titles are very case sensitive, so "Editing Guide" and "Editing guide" are two different things. However, I can set up a redirect on "Editing guide" so that any time someone links to the lower case version, they are automatically taken to the upper case version, which is where we are now.
- Generate Table
This is a powerful tool that will help you build an HTML table that can be used to organize information like a spreadsheet. You should only ever use this button if you have the "Enable wizards" setting turned on, which is covered in the "Preferences" section above. Additionally, you should only ever use this button if you understand how to work with HTML tables, as you might find yourself confused otherwise. The tool does do what it can to help make the process simpler though, and with the wizard enabled it lets you choose how many rows and columns to generate automatically, as well as other formatting options.
- Text Size
This button generates the necessary formatting code to let you resize your text. The basic formatting is this: {{Resize|100%|This text is a test}}. "100%" is default text size, and whatever number you set it to will determine how much the text scales or shrinks by.
- Text Color
This button generates the necessary formatting code to let you resize your text. The basic formatting is this: {{Color|#000000|This text is a test}}. The "#000000" text indicates that the text in question will become black. In order for this formatting option to work you must include a 3-6 digit HTML color code, preceded by a pound side("#"). A good, basic list exists here, but these codes can be generated by almost any standard image editor, such as Photoshop or paint.
- Font
This button generates the necessary formatting code to let you resize your text. The basic formatting is this: {{Font|fontname|This text is a test}}. The "fontname" text is the name of the desired font. No list of accepted fonts exists, nor will it. Most standard typefaces, such as Times New Roman, are available to use, however.
- Create Box
If you notice, there are a few "backgrounds" on our website. There is the light grey "base", which you might notice on most pages, and then a darker grey "box" surrounding the actual text. You can see it on this guide, any of the navigation pages, and all issues of the Magazine. This button simply generates the code necessary to create this box.
- Columns
The three buttons marked "Start column", "Start second column", and "End columns" are all used together in order to create two equal vertical columns of text next to each other. The basic format is as follows: {{col-begin}}Text in the first column{{col-2}}Text in the second column{{col-end}}. This ultimately results in:
Please note that, despite the highlighted example, the "{{col-2}}" text MUST be on a different line than "{{Col-begin}}" in order for this to work.
SPECIAL CHARACTERS
The "Special Characters" dropdown on the toolbar opens up a menu with a lot more pieces of text available for you to use. This guide will not go into this section at all because there is simply to much to go through, but it's pretty self explanatory regardless. Select a character group on th left, such as "Latin", "Greek", or "Arabic", and then simply click one of the buttons on the right to insert it where you last clicked.
HELP
The "Help" menu will not be covered in this guide in any fashion, as it is essentially a much simpler version of the more in-depth formatting guide. The Wiki generates it by default, and it explains so much the super basic formatting features such as italics and bold text. Everything talked about in this section has a corresponding button either in the basic or advanced sections of the toolbar, and we have already covered those.
How to Use VisualEditor
VisualEditor is the simpler, but also less flexible, tool you can use to edit pages. In terms of easily editing a pages text without going through the process of sorting through all of its formatting code, VisualEditor is unbeaten. But if you want to do anything more complex, such as tables, templates, or parser functions, you will find that WikiEditor might be easier to work with instead. Nevertheless, keep reading to learn how to navigate the VisualEditor interface so you can get started editing today!
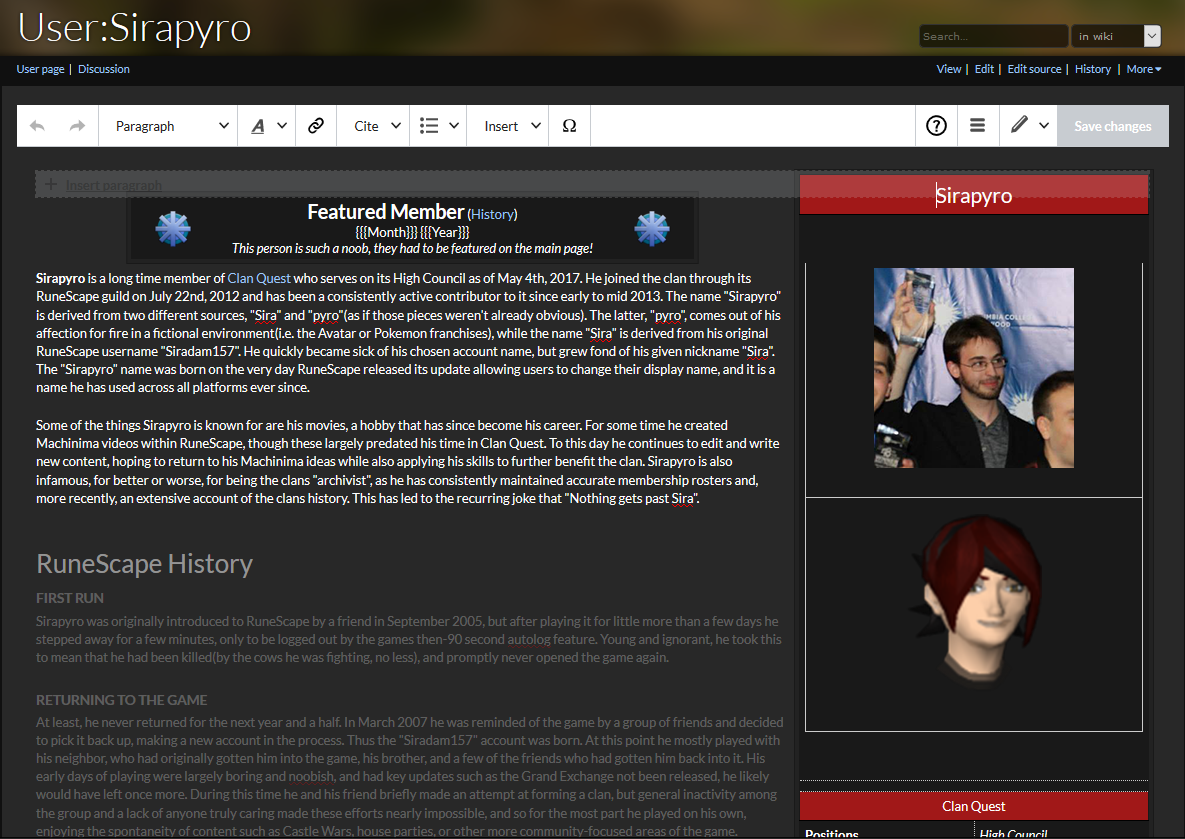
When you look at the image below, you might be a bit lost at what you're seeing. Basically, VisualEditor works in this way: Templates/Tables are turned into functions that can be interacted with to a limited extent, and all standard text is broken down into sections, which you can see below. The white text has been selected for editing, while everything below it is grey'd out. Simply click on the text you want to work with and the VisualEditor will automatically shift to that section.
Toolbar
Much like the WikiEditor, the VisualEditor has multiple different dropdown menus that offer a wide range of formatting options. Unfortunately, the VisualEditor has slightly less useful features because it cannot be customized by the Wiki staff. What you see is what you get, whereas with the WikiEditor we can add new buttons as needed.

BASIC
When you first start editing with the VisualEditor you will see something that closely resembles the image above, though with notably less red lines coming off of it. There are a number of different buttons on here, though many of them are dropdown menus with additional settings. As such, only the buttons that do not have additional options will be covered in the "Basic" section of this Guide.
- Undo/Redo
On the furthest left side of the toolbar you will see two buttons, arrows pointing either left or right. These are shortcuts that allow you to undo or redo a change. This is exactly the same as pressing ctrl/cmd+z for undo, or ctrl/cmd+shift+z(or ctrl/cmd+y in some cases) for redo on any standard PC or Mac computer. It is also the same as going to your browsers "Edit" tab at the top and clicking "Undo" or "Redo" there.
- Page Link Tool
If you highlight a piece of text and then click this button, a menu will appear that will help you in adding a link to that particular piece of text.
You can use the menu that pops up to search for a page on the Wiki, or enter a link to an external web page, and once you click "done" it will automatically apply that link for you. It makes life super simple.
- Visual/Source Switcher
This button was referenced earlier on in this Guide, but for the sake of repetition: This button is a dropdown menu that allows you to freely switch between the VisualEditor ("Visual Editing") and the WikiEditor ("Source Editing"). It should save all of your changes when you switch, however it has been known to have some bugs.
- Save Changes
This is the button that you press to, as the name suggests, save your changes. Once you're done editing a page you have to click this in order to stop editing it and ensure your changes are applied. Think of it as saving a text document in Word.
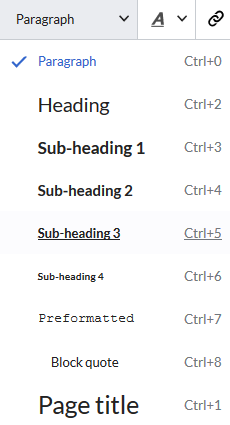
PARAGRAPH/TITLE MENU DROPDOWN
While we will not go into great detail on this dropdown, you should know that this is where you will go if you want to create section headers for your page. The top level "paragraph" option is simply standard, default text that will make up the bulk of your content. The "Heading" and "Sub-Heading" options are used to create section headers, which will automatically be used to generate your pages Table of Contents. "Sub-heading 1" appears below "Heading", "Sub-heading 2" appears below "Sub-heading 1", and so on.
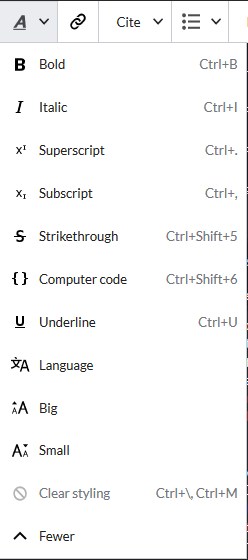
FORMATTING OPTIONS DROPDOWN
This, the "Formatting Options" dropdown, is the menu you will likely use more than any other. This is where all of your basic text formatting options can be found. Bold text, italics, underlining, strikethrough, it's all found here. While this is an incredibly useful tool for formatting your page, it is also where the VisualEditor is at its weakest. Because it cannot be customized like the WikiEditor, the tools available to you in this menu are the only tools that will ever be there. And as you might notice, it lacks text size, text color, font, and other options useful for formatting your text. This is a limitation of the software that you can overcome by learning how to manually apply these formatting options by reading the formatting guide, or by using the WikiEditor instead.
Please note that note all of the buttons in this menu currently work. "Superscript", "Subscript", "Computer code", "Big", "Small", and "Clear styling" are all HTML functions that do not currently work at this time. They all have alternative workarounds that are arguably simpler to use, but as mentioned above, you must read the formatting guide or use the WikiEditor to access them. Additionally, the "Language" button is a useless feature on our Wiki as we do not currently support any language other than English.
CITATION MENU DROPDOWN
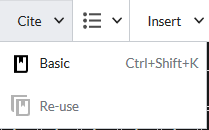
When you press the "Citation Menu" button it will open up a short dropdown menu with two options: Basic, and Re-use. These are the basic tools required for Wiki-style "references" like you would see on Wikipedia. These tools are available for you to experiment with, but will not be covered in this Guide.
LIST/INDENTATION OPTIONS DROPDOWN
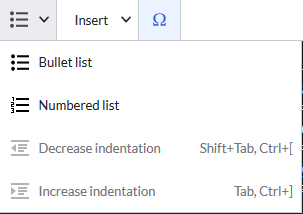
This dropdown menu gives you a few basic options that help you to either create bulleted/numbered lists, or to indent an entire paragraph so that it hovers further to the left. The indentation buttons at the bottom will only work on a highlighted paragraph, and these features do not work for individual pieces of text. The bullet list and numbered list options will start a new list where you cursor is positioned, and every time you hit enter/return it will add a new item to the list. Simple.
INSERT MENU DROPDOWN
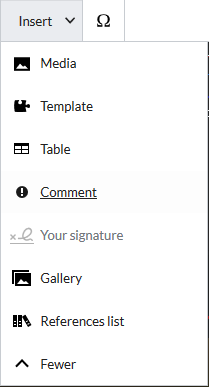
When you open this menu, you might notice that it has less options than the above image. To solve that, simply click the "More" button at the bottom. Now it should perfectly resemble the image above! Let's run through all of the different options available to you in this menu:
- Media
Clicking this button will bring up a tool that will help you find and insert an image on the Wiki onto your page. It has additional options to help you format that image. That's all there is to it.
- Template
The "Template" button is a powerful, though sometimes confusing, tool that can help you automatically insert and format a Wiki template on your page. This will be covered in greater detail on the formatting guide.
- Table
This tool brings up a menu that helps you automatically generate a spreadsheet-like table. From it you can specify how many rows or columns you want by clicking on the generated arrows, and further customization options are available to you through the "Properties" button. Creating tables will not be touched on in-depth in this guide.
- Comment
Pressing the "Comment" button will bring up a new text box that will allow you to add notes or comments to a page that will only appear while you are editing it. Readers will never be able to see these comments, so it is a useful tool for jotting down thoughts or general notes when editing a page.
- Your Signature
Clicking this button will automatically insert the necessary code required to add your signature to a page. Usually a signature will only ever be used on a vote page, in which case the wiki staff have already generated a seperate button to make it even easier to cast your vote.
- Gallery
A "Gallery" is a Wiki tool that allows you to format multiple images in more unique, powerful ways. Unfortunately this does not work properly at this time, so it will not be delved into.
- References List
This will insert the necessary code to generate a "References List" where you want it to appear on the page. This goes hand in hand with the "Citation Menu Dropdown" section above.
SPECIAL CHARACTERS MENU DROPDOWN
The "Special Characters Menu" is a button that opens up a large dropdown window that gives you a list of additional characters you can insert into your page. Basically, this means that you can insert characters from other languages using this dropdown, such as Greek, Latin, or Arabic. Feel free to browse this menu, and all of its sub-menus, but due to the sheer volume of characters available to you, it will not be further covered in this Guide.
HELP
The "Help" button opens a dropdown menu with a few links to pre-generated help articles on formatting and keyboard shortcuts. You can feel free to read the links on this dropdown as you please. It will not be covered in this Guide.
PAGE SETTINGS
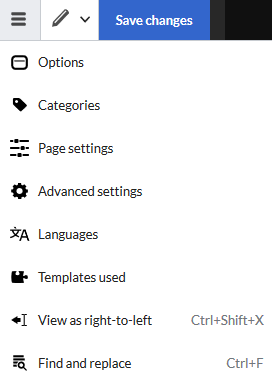
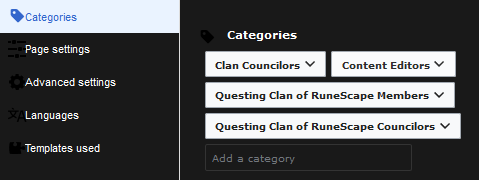
This dropdown menu gives a greater variety of advanced options for setting up your page. These will not be covered in this guide as most of them are administrative in nature. However, the "Categories" button is important for any prospective editor on the Wiki to know about. When you press this button, you will be presented with a new window that looks like this:
From this menu you can add a "Category" to a page, using the "Add a category" text box. Categories are used to group similar pages together, or "categorize" them, and it's very important that you add a relevant category to your page. It is also very important that you never create a new category, only wiki staff are permitted to do this unless permission is otherwise given. If you have any doubts on how to categorize your page, please ask a Clan Councilor.

