
Written by Derparnieux
The Croesus front is the third front of the Elder God Wars Dungeon, released on September 27, 2021. It is RuneScape's first official skilling boss. The recommended group size for the boss is 8, although it is very much possible to do the boss with 4 well-prepared people. In this guide, I will assume you know the basics of the Croesus fight; if you don't, there are already a few beginner guides available on YouTube (e.g. by Protoxx and Maikeru). Now, let's get into how to 4-man Croesus.
Contents
You absolutely need Bladed Dive
In my mind, there is only one unlock that is absolutely essential for all players to have in a 4-man Croesus encounter: the Bladed Dive ability. This is essential because 4-manning Croesus requires you to move around the arena a fair bit more than you would in an 8-man encounter, and having Bladed Dive enables you to cross the north-south lanes (mushroom fields) much faster and much easier. Also, it's just very beneficial for your mobility, so you can get to the middle faster in clutch situations. Of course, you will always want to bring the Mobile perk in some form, whether that be on an offhand (like enhanced Excalibur) or through the Shadow's Grace relic power.
Example preset
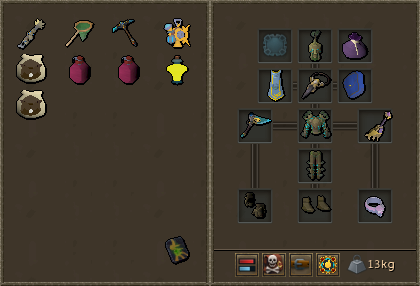
Obviously, if you're going to be 4-manning Croesus, you will need one player for each of the four skills (Hunter, Fishing, Mining, Woodcutting) involved in the Croesus fight. The preset above is a Woodcutting preset, but just sub in the correct elite skilling outfit and tool for your chosen style. It is essential to have at least 16 free inventory spots, preferably at least 18.
At the time of writing, the crystal fishing rod doesn't work inside the Croesus encounter, in the sense that it doesn't give its 5% success bonus and you also don't benefit from any perks you have on it. As such, you should really be using a rod-o-matic for Fishing.
- You will want to take the tools for the three styles you don't main. Firstly, this is because someone in your team might make a mistake, and they could need you to help them out for a second. Secondly, this is because I switch to the correct tool for dealing damage to the boss' core; this is probably not necessary, but I do it anyway. The Hunter tool is the magic butterfly net, which can be obtained by taking three gourmet impling jars, two earth impling jars, and one essence impling jar to Elnock Inquisitor in the center of Puro-Puro. Note that the regular butterfly net, which can be purchased from the Hunter shop in Yanille, has no effect at Croesus
- I bring a powerburst of acceleration for when I need to hop back over the mushroom field when my Bladed Dive is still on cooldown. Not essential to bring, but I've used it a fair few times during 4-mans.
- Super restores are essential to restore your stats whenever they are drained, so bring a few. Typically a few doses are enough to last a kill, but you might make mistakes, so bring plenty (definitely if you're learning).
- The artificer's measure and Orthen furnace core skilling offhands each have an effect inside the Croesus encounter. The artificer's measure speeds up your progress restoring statues, and the Orthen furnace core allows you to deal with the sticky-fungus-at-your-feet mechanic without having to bring logs (and also deals with it faster than using logs!). These are nice in combination with the Shadow's Grace relic power, as it means you don't have to bring the Mobile perk on an offhand (like enhanced Excalibur) and can instead just bring one skilling offhand (or both if you don't mind switching during the kill). These are definitely worth taking.
- The skilling offhands that come from Croesus, Sana's fyrtorch and Tagga's corehammer, also work in terms of their style-specific boosts inside the Croesus encounter. Additionally, Sana's fyrtorch provides the same effect as the Orthen furnace core. These are super nice for their relevant skills, they speed up gathering by a lot.
- If you don't have an Orthen furnace core or Sana's fyrtorch, then bring protean logs so you can free yourself from the sticky fungus.
- The only skill cape that actually has a beneficial effect inside the Croesus arena is, as far as I know, the Fishing cape. As such, you will want to wear it for its effect.
- Seren spirits can spawn inside the arena, so bring your grace of the elves if you have it. Its porter effect doesn't work inside the Croesus arena, so you don't need to worry about that.
- As for pocket slot, it honestly doesn't matter. You can take a brooch of the Gods, but if you have urns of the relevant skills inside it, then it'll keep teleporting them to your inventory and that's going to be annoying. You can take a scripture of Bik for extra clues, if you have it. I just take Charos' clue carrier so that the clues I obtain through Prosper don't clog up my inventory.
- I take a rune pouch filled with body, soul and lava runes. These allow you to cast the Crystal Mask spell, which will allow you to negate one stat drain attack from Croesus. Essentially, this is a panic button for when the orange blobs spawn that follow you around and you aren't able to dodge or trap them. Quite non-essential, so if you don't want to bring this, don't bother. Note that you can also take a grasping rune pouch with body, soul, earth and fire runes, as this is slightly cheaper per cast. Its special effect won't work on Crystal Mask, though, because it isn't a combat spell.
- The upgraded pontifex ring is pretty alright for its Bik front passive; it will reduce all stat drains in the Croesus arena by 25%. Moreover, if you've fully upgraded it, it will now also allow you to get tier 3 troves. Once you've overcharged it with 5k of each anima and its benefits are now passive, you should substitute it for a ring of whispers.
- You should summon a familiar to help you in the Croesus fight. These are the arctic bear (Hunter), granite lobster (Fishing), gargoyle (Mining) and beaver (Woodcutting).
Besides the things included in the preset, there are a few other boosts you can use:
- You should use an aura as well; just choose the aura that's specific to your chosen style. Obviously, the higher tier your aura is, the better. These are the Tracker aura (Hunter), the Call of the Sea aura (Fishing), the Quarrymaster aura (Mining) and the Lumberjack aura (Woodcutting).
- Augmenting your (Fishing/Mining/Woodcutting) tools and putting the perk Honed 6 (or lower, but Honed 6 isn't super difficult to get) on them is nice for the skilling boost.
- As usual, luck boosts apply, so you can bring a Luck of the Dwarves ring switch or use the corresponding relic power. I use the relic power.
- Although I don't know this for sure, the description of the perfect plus potion on the RuneScape Wiki leads me to believe that it has beneficial effects for Fishing and Woodcutting inside the Croesus arena, so definitely have that active as well. Also, people are saying having perfect plus active makes it so you have a chance at double-damaging the core? I'm not sure, but a single dose lasts for 4 hours, so just use it.
Archaeology relic powers
I've mentioned relic powers multiple times throughout the guide so far, but I figured to list them separately as well. These are the most useful relic powers for the Croesus encounter:
- The Shadow's Grace relic power is essentially the Mobile perk. Having this relic power active means you don't have to bring a Mobile offhand (like enhanced Excalibur), so you can camp skilling offhands during the entire encounter.
- The Luck of the Dwarves relic power means you don't have to bring (or wear) a Luck of the Dwarves, so you can camp your upgraded pontifex ring or a ring of whispers.
- The Inspire Effort relic power provides a 2% XP boost for all gathering skills, which is probably your best option for the third relic slot. You might consider Inspire Genius instead, as this provides a 2% XP boost to Construction, so you get some extra XP while restoring statues.
Mechanics & rotation
- Croesus throws a smoke bomb at you that stays around for a decent amount of time (15-20 seconds?). If you stand inside the smoke, your stats get drained. If you time it correctly, you can walk away and back to your current skilling node to get Croesus to throw the bomb off to the side.
- A fairy ring starts to form underneath your current position. If you don't move away fast enough, it will teleport you randomly to a different position in the arena.
- An orange blob spawns that attempts to explode in your face. If you get hit by it, your stats are drained quite heavily. You can walk away from it, try to trap it (which it often does itself) or cast the Crystal Mask spell to be able to face-tank it.
- Croesus throws a stun bomb at you. You can deal with it through using the Anticipate and Freedom abilities.
- You get locked in place by sticky fungus at your feet, and you have to burn them away before you can walk again. This requires either logs, timber fungus, the Orthen furnace core or Sana's fyrtorch. If you don't have these, you require someone else to free you (which requires nothing).
- Piles of energy fungus spawn in the middle of the arena. The team has to remove these in time, or they add tons of enrage stacks. These seem to be an important factor in distributing contribution scores, so everyone should get on these piles ideally as soon as they spawn.
Consecutive mechanics are 12 seconds apart, and they always go in a specific order: smoke bomb -> fairy ring -> orange blob -> smoke bomb -> stun bomb -> sticky fungus. The energy fungus will coincide with every second sticky fungus (at approximately 2:30, 5:00, 7:30, ...); this pauses the timer between mechanics, and it starts running again when the energy fungus piles are fully removed. Use the timing knowledge to deal with mechanics accordingly, i.e. walking the smoke bomb to a nice spot, activating Crystal Mask before the orange blob spawns, using Anticipate before the stun bomb lands and moving to the middle before the energy fungus spawns. This takes some practice, but the best way to improve at Croesus is to be mindful of mechanics and learn to deal with them properly.
The 4-man strategy
- Gather 16 resources from your creature and deposit them in the deposit box. Try to always be gathering from the sparkly node on the creature.
- Gather 16 more resources and deplete your creature in the process. There are nodes on the side you can gather more resources on.
- Once you have 16 resources and your creature is depleted, move halfway across the arena (two corners over in either direction). Contribute your resources to that statue and take the resources from the deposit box.
- Move one corner anti-clockwise and contribute your resources to that statue.
- In the corner you end up at, skill on the nodes and left-click rot the obtained resources until you have a total of 10 rotten fungus. Poison the creature.
- Restore your statue and pre-pray a little. Don't finish praying until after the second time the energy fungus appears in the middle of the arena. Energy fungus spawning in the middle is typically called mid, and we say pray after second mid. Second mid is at about 5:00 into the kill.
- After second mid and with at least three statues (close to) completion, everyone should pray. If you're not done yet with your statue and other people pray, this is fine; just finish your statue, pray, and then join the others on core. With four experienced players, everyone should be done restoring their statue by second mid.
Important mechanics to look out for are the stun bombs at about 2:15 and 4:50. Once they land, make your way to the middle immediately and be ready to get on the energy fungus piles as they spawn. They are essential for your contribution.
If you're fast enough at gathering, you can take the fairy rings that spawn at 1:36. They will take you to a random corner in the arena, so this may spare you some travelling time. I have to say, though, I always opt not to do this (as I just end up having to wait a full minute at the end of the kill if I do). Instead, I do something different: I gather my 10 rot at my starting corner (different than described above) and only start travelling either just before or just after the first mid at 2:30. You should prioritise travelling; if you wait with travelling until very late in the kill, then you'll have another player waiting on your resources, and they aren't going to appreciate that. In general, you should aim to finish gathering and start travelling before first mid.
If you make a mistake, please call it out as soon as possible. If you someone else make a mistake, call it out as well. Solve problems together.
This method is known as 2-1-rot. This is because you travel 2 corners, then travel 1 corner, then rot. This is by far the most popular method for 4-man Croesus.
Particles on the core
When the middle opens up, everyone will need to go and do damage to the boss by skilling on the core node. When you see yellow or green particles on the core, click the core once to deal extra damage to the boss. When you see red particles, do NOT click the core; clicking during red particles will heal the boss. You can continue skilling on the core when red particles emerge, just make sure you don't click on the core again during red particles.
What can go wrong?
- In the east-west corridors, you can accidentally not climb the mushroom with the sparkles and lose one of your resources. Don't forget, you should always climb over the mushroom with the sparkles.
- In the north-south lanes, you can accidentally mess up the Bladed Dive + Surge combo. This is the worst thing to make a mistake on, because this will consume a ton of the resources you have gathered, and you will need to go back to get more. Luckily, you can take a few seconds to ensure you do the Bladed Dive + Surge combo correctly.
- If no one pays attention to the mechanic in the middle with the energy fungus, then the boss will gain too many enrage stacks and you will almost certainly fail the kill. Therefore, you should always keep an eye on the middle, and if you see the little energy fungus piles spawn, then you should tell everyone to go to middle to remove them. In general, a good rule of thumb is: when someone shouts "MIDDLE!", you go to the middle.
- You should make sure to avoid as many stat drains as possible; if people get hit too much, the enrage counter will hit 100%, and the kill will fail.
- Someone could have forgotten to deplete and/or poison a creature, which could result in the boss taking much less damage than usual. If you notice this, call it out and fix it immediately before restoring any more statues, or you will almost certainly fail the kill.
Bladed Dive + Surge combo
- Stand at the bottom of the stairs, and face towards the other side of the north-south lane. It doesn't matter where you stand specifically, you just need to face straight to the other side (not diagonally!).
- Press the keybind for your Bladed Dive.
- Right-click the bottom of the stairs straight across from you, and hover your mouse over the Bladed Dive "Activate" action.
- In the same tick, press your Surge keybind and click the Bladed Dive "Activate" action. You will end up at the bottom of the stairs on the other side. Your stats will not have drained and no resources will have been consumed from your inventory.
- If you use Bladed Dive before you Surge (but still in the same tick), it's not necessary to face straight ahead, as the Bladed Dive will determine the direction you Surge in. If you're careful enough, you can do this method while walking up to the mushroom field, but this takes some practice.