
Written by Derparnieux
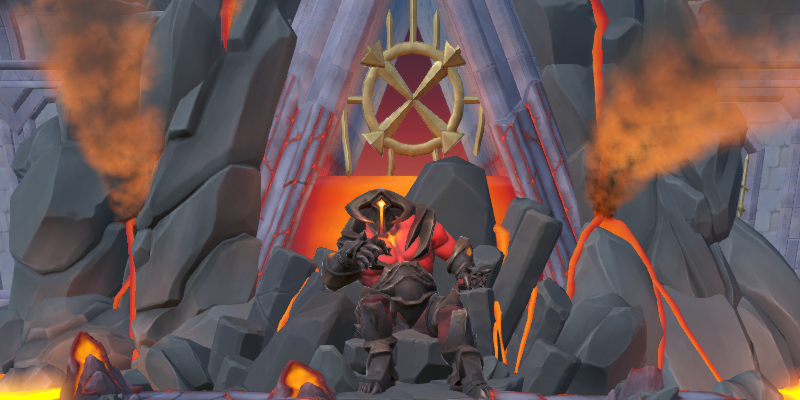
The TzekHaar front is the fourth and final (?) front of the Elder God Wars Dungeon, released on October 25, 2021. As with all TzHaar-like combat encounters we've faced so far, the main attraction is a wave-based combat encounter with the TzKal-Zuk boss fight at the end. This encounter is colloquially called the Inferno, after its OSRS counterpart with the same boss. In this guide, I'll take you through the important things you should know before heading into the fight.
The intent for this guide is to help players complete their flawless normal mode runs. Hard mode is far above my paygrade, so if you're looking for assistance there, I'm afraid this guide won't be of any help.
Contents
Example preset
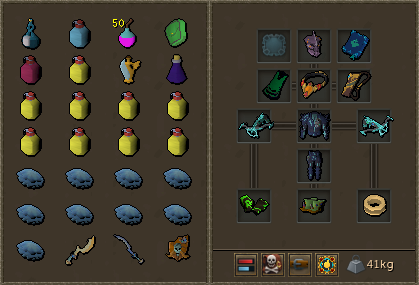
The above preset is what I used to get flawless normal mode runs. Let's see what's important.
- You'll want your usual collection of potions for bossing. For me, this includes an elder overload salve, weapon poison +++, vulnerability bombs, an adrenaline renewal, my blessed flask, one super restore and Saradomin brews. The super restore is used separately from the blessed flask, because TzKal-Zuk has a mechanic where he lowers your max HP, and you'll need to sip a super restore to bring it back up. If you don't own a blessed flask, you'll probably be fine if you bring three extra super restore flasks.
- For food, I use blue blubber jellyfish. If you're learning, you'll 100% want to bring a pack yak filled with more brews and/or jellyfish. Once you get the hang of normal mode, your food usage will drastically decrease, and you can switch from a pack yak to a ripper demon.
- The Bladed Dive switch is just for a certain phase in the TzKal-Zuk fight. You don't have to bring it, but I bring it because I don't like relying on the clunky performance of Surge.
- The rune pouch with runes for Disruption Shield is incredibly nice for TzKal-Zuk. If you've unlocked the spell at Lunar farm, definitely bring the runes for it. Don't forget to swap to the Lunar spellbook as well.
- The shield switch is essential if you want a flawless run, as you'll need to Barricade at a certain point during the run. A shield is nice for defensives, anyway.
- Note that your Barricade will need to last for at least 10 seconds; if you don't have a T90 Shield, you might want to invest in the Turtling Invention perk or the Ranch out of Time Malletops perk (requiring 117 Farming)
- If you're not confident with the challenges, a Powerburst of vitality can be a helpful addition; because the potion effectively halves damage taken for six seconds, it is a useful way to reduce the large damage hit you receive if you fail the first two challenges
- The obsidian ranger helm is nice because it decreases your damage taken by 9% (including against TzKal-Zuk) and increases your accuracy by 10% (this doesn't work against TzKal-Zuk). This is quite a big deal when it comes to survivability. If you have spare Tokkul, you can donate them to the coffer outside the Fight Kiln to increase the damage reduction by 10%
- Inside my quiver, I have onyx bakriminel bolts (e). These are an absolute gamechanger inside the Inferno as their healing effect massively reduces your food usage. Trust me, you'll want to use these.
- The TokKul-Zo provides a 10% damage boost to all creatures (except TzKal-Zuk) inside the Inferno, so it's very much worth it. Once you get more experienced and you haven't overcharged your pontifex ring, you might want to use that instead just for the tier 3 troves, as Pernix quiver fragments are super valuable at the moment. The Inferno absolutely eats through your charges on the TokKul-Zo, though, so keep in mind that you'll have to recharge at the TzHaar City main plaza quite frequently.
- Other than that, it's really just your standard Ranged setup. The essence of finality contains the dark bow special attack, which is quite nice for certain parts of the kill, or in general when you have a lot of adrenaline but all of your thresholds are on cooldown. All creatures inside the Inferno are poisonable, so cinderbane gloves with weapon poison +++ are super nice. The scripture of Wen deals a ton of damage when it procs.
- If you're wondering about my cape slot, this is the Igneous Kal-Xil (the upgraded Ranged kiln cape). If you don't have it yet, just use the regular Ranged kiln cape.
- Last but not least, I use the Vampyrism aura for the extra healing. Again, once you get more experienced, you can probably start switching this out for damage-enhancing auras (Mahjarrat, Dark Magic, ...).
- Penance aura is another good choice if you don't have a Blessed flask and want to save inventory space for more healing items
The basics
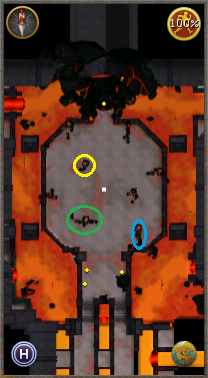
The Inferno consists of exactly 18 waves. About half of these waves aren't very problematic; they just consist of regular monsters being dropped in the Inferno, which you'll have to dispose of before you move on to the next wave. Make sure to use your protection prayers and use Devotion when you can. The main issue with these waves is that you'll want to minimise your food usage, as you'll need your food during the more difficult waves. The green-circled rock in the minimap above is a very useful rock, colloquially dubbed the safety rock, as strategically placing yourself around this rock will mean certain minions will not be able to reach you.
The important checkpoints in the fight are the challenge waves: wave 5, wave 10 and wave 15. The wave before each challenge (wave 4, wave 9, wave 14) also has a special mechanic that needs to be dealt with in its own way. The wave after each challenge (wave 6, wave 11, wave 16) contain an increasing number of TzekHaar-Jads. Wave 17 is a fight against TzekHaar-Aken, which you might remember from the Fight Kiln, and wave 18 is the final boss fight against TzKal-Zuk himself.
For a flawless normal mode run, you have to successfully complete all challenge waves. It's possible to fail the challenge waves; this will not end your run, you'll just take a fair amount of damage. Getting an igneous stone to upgrade your capes only requires getting through the Inferno without dying, so failing a challenge is okay (as long as you survive). The only reward for a truly flawless run is access to hard mode.
The first challenge
The first part of the Inferno, waves 1-5, is sort-of the melee phase of the Inferno. Most of the monsters that spawn are melee monsters, although you will face a few mages and rangers. Pray accordingly.
Wave 4
You'll be up against three Igneous TzekHaar-Hur (or igneous warrior) alongside some regular melee monsters. It's important to focus on the igneous warriors. You'll need to stun the igneous warriors before you can properly damage them, so have your Binding Shot and Tight Bindings ready. Once you take down all three igneous warriors, you'll see your special action button appear.
Walk up to Zuk and press your special action button. All of the regular monsters will now be instakilled, and you'll be able to damage Zuk for a short period of time. In this time, you'll want to try to do 50k damage to the boss. Place a Death's Swiftness, drink an adrenaline potion and go to town. If you fail to reach 50k damage on Zuk, you'll have to repeat this wave until your total damage on Zuk is 50k. After that, you'll go to the first challenge wave: wave 5.
Wave 5
You'll be placed inside a small circle, and five Volatile TzekHaar-Hur will spawn. They all have 8k HP, and the objective is to kill them all before the bars above their heads have filled up. This is essentially just a DPS race, so this is the time to bust out all of your thresholds and special attacks. If you don't kill them all before your time's up, they'll explode for heavy damage (and you will fail the challenge). If you're struggling to kill all five, sip a Powerburst of vitality before the timer runs out to halve the damage from the explosion.
If you kill all five or survive the explosion, you will move on to wave 6.
Wave 6
Wave 6 is like a regular wave, except it will contain one TzekHaar-Jad. This Jad will spawn in the south, so I've found the best place to stand at the start of the wave is north of the yellow-circled rock (see minimap above). When Jad spawns, it should be trapped in the southern part of the arena, so kill the regular monsters first before moving onto Jad. Jad doesn't have any special mechanics, just make sure to flick your protection prayers correctly and you'll get through.
The second challenge
The second part of the Inferno, waves 6-10, is sort-of the ranged phase of the Inferno. Most of the monsters that spawn are rangers, although you will face a few mages and warriors. Pray accordingly.
This section also introduces the TzekHaar-Tok-Xil, the big Rangers. These monsters should be prioritized, partly because they hit hard, but also because their accuracy and damage increases the longer they stand in one place, which makes them very dangerous.
Wave 9
You'll be up against three Igneous TzekHaar-Xil (or igneous ranger) alongside some regular ranged monsters. It's important to focus on the igneous rangers. You'll need to use a threshold ability on the igneous rangers before you can properly damage them, so make sure you have your thresholds ready. Once you take down all three igneous rangers, you'll see your special action button appear. The "50k damage on Zuk"-thing is repeated here.
Wave 10
After dealing the 50k damage to Zuk, you'll be placed inside a small circle again. One Unbreakable TzekHaar-Ket will spawn with 20k HP. This monster is quite annoying to deal with, because he only takes damage from hits 3000 or above. As such, it's important to have a Death's Swiftness up and use high-damaging abilities like Snapshot, Shadow Tendrils, the Dark Bow special attack and Greater Ricochet. If you don't get him down in time, he'll explode for high damage. As with the first challenge, if you're not able to kill him in time, a sip of Powerburst of vitality will halve the damage from this explosion, making it more survivable.
You'll now move on to wave 11.
Wave 11
Wave 11 is like a regular wave, except it will contain two TzekHaar-Jad. These Jads will spawn in the northwest and northeast corner, so I stand east to northeast of the blue-circled rock. This should trap both of the Jads exactly where they spawn. Deal with the minions, kill the northeastern Jad, then kill the northwestern Jad. Make sure to flick your protection players correctly and you'll be fine.
The third challenge
The third part of the Inferno, waves 11-15, is sort-of the magic phase of the Inferno. Most of the monsters that spawn are mages, although you will face a few rangers and warriors. Pray accordingly.
This section introduces the TzekHaar-Ket-Zek, large four-legged creatures that attack with magic. In addition to hitting hard, their attacks apply the same Geothermal Burn debuff as TzKal-Zuk himself (described below), which hits for high magic damage. The Freedom ability clears this bleed, and the damage is halted by killing a Ket-Zek (though it starts again when re-applied).
Wave 14
You'll be up against three Igneous TzekHaar-Mej (or igneous mage) alongside some regular magic monsters. It's important to focus on the igneous mages. You'll need to stand inside the igneous mage's shield before you can properly damage it, so be prepared to move a lot. Once you take down all three igneous mages, you'll see your special action button appear. The "50k damage on Zuk"-thing is repeated here.
Wave 15
After dealing the 50k damage to Zuk, you'll be placed inside a small circle again. Three Fatal TzekHaar-Yt-HurKot will spawn, and they'll launch a combined total of four attacks against you. I believe they always start and end with a typeless hit, with one Magic hit and one Ranged hit in between, although the order of the Magic and Ranged hits is different between kills. In any case, the easy way to deal with this challenge is to use Barricade. This requires 100% adrenaline and a shield, so you'll need to plan accordingly.
If you can't get 100% adrenaline for Barricade, a more intensive way to deal with this challenge is as follows:
- Resonance the first hit, which is guaranteed to be typeless damage
- Activate Devotion and pray against the next two attacks, which can be any combination of Mage and Ranged damage (pray Mage against blue projectiles, and pray Ranged against green projectiles)
- Disruption Shield the last hit, which is also guaranteed to be typeless damage. If you don't have Disruption Shield unlocked, you can also use Divert, Reflect, or Debilitate to reduce the damage (these options will fail the challenge, but will help you survive a no-checkpoint run)
Wave 16
Wave 16 contains just three TzekHaar-Jad. One will spawn in the middle of the arena, one will spawn in the northwest and one will spawn in the northeast. You can use the same safespot as in wave 11, east to northeast of the blue-circled rock, and you can deal with the Jads one by one.
The final countdown
Wave 17
Wave 17 is the TzekHaar-Aken fight. TzekHaar-Aken will appear either along the western or the eastern edge of the arena. While he's up, deal as much damage to him as you can: use Death's Swiftness and your thresholds and go to town. Occassionally, a lava bomb will shoot up from the lava surrounding TzekHaar-Aken. To dodge this bomb, move two squares in any direction. It's important to dodge these bombs, because they'll hit for a fair amount of damage and reduce your adrenaline gain for a short while.
After some amount of time, TzekHaar-Aken will go under again. You can build adrenaline on the tentacles while making sure to dodge the lava bombs. When you get the message that TzekHaar-Aken is bombing you and lava bombs shoot up from the geysers inside the arena, just Surge away from your current location and you'll avoid all of the bombs. TzekHaar-Aken appears again after attempting to bomb you twice. Rinse and repeat until you kill TzekHaar-Aken. It's important to note that he might (re)appear on either side of the arena, so keep your eyes open.
When waiting for the head to re-appear, don't forget to clear the tentacles that spawn around the edges of the arena, particularly the Magic tentacles. They're useful for building adrenaline, but the magic-using tentacles specifically absorb damage dealt to TzekHaar-Aken, based on however many are still alive, up to a maximum of 1100 damage; it shouldn't be critical to the fight, but it can slow your kills tremendously if you have too many alive when the head comes up.
Wave 18
Your final hurdle is TzKal-Zuk himself. He will mainly attack you with Melee attacks, although he will hit you with the occassional Magic attack if you're outside Melee distance. He'll move himself into Melee distance, though, so you don't have to worry about the Magic attacks too much. The hardest part about the Zuk fights are his mechanics, though, so allow me to cover those. His mechanics will always occur in the same order, which is the same order as below.
- Zuk's first mechanic is the Geothermal Burn. He'll shout You will break beneath me! and apply a bleed to you. Make sure to Freedom as soon as possible, because this bleed can deal good amounts of Magic damage.
- Zuk's second mechanic is the Searing Burn. He'll shout Sear! or Suffer! and stab you, which does some Magic and Melee damage. Most importantly, though, he applies a debuff that reduces your max HP. To get rid of this debuff, you'll need to move a total of 15 squares: this can be easily done by Surging through Zuk and then walking back to the boss. To restore your max HP, sip a super restore.
- One thing to watch out for if Surging to avoid this mechanic is Zuk's auto-attacks; he uses a magic auto-attack when his target is out of melee distance, and you can sometimes trigger it when Surging through him. Watch his character model, and pray mage if he stretches his hand out and clenches a fist, then switch back to praying melee
- Zuk's third mechanic is the Quake. He'll shout Tremble before me! or Fall before my might! and cause the ground to quake in a few locations around him. To deal with this mechanic, just Surge through Zuk and continue damaging him from the other side. If you do happen to get hit by one of the eruptions, just eat.
- Zuk's fourth mechanic is the Empowered Magic. He'll shout Die!, Begone! or Ful's power flows through me! and launch a bomb at you. Once he starts shouting and forming the bomb in his hand, you'll immediately want to cast Disruption Shield, or you'll be hit with a ton of damage. You can also switch to your shield and use Renonance or Debilitate/Reflect, but you have a very small time window to prepare for the bomb.
Zuk's last mechanic, Igneous Rain, deserves some more explanation. He shouts Flames consume you! or Burn!, teleports to the center of the arena and becomes immune to attacks. He'll also drag you to a random location in the arena. Make sure to use Anticipate when he shouts and teleports, otherwise the drag will stun you. If you didn't Anticipate in time, you can also use Freedom to get rid of the stun. Zuk will light up the arena with lava rain; you have a few seconds to move to the section of the arena that is currently unaffected by the rain. This safe section will always be about one third of a turn clockwise from your current location, so use Surge and Bladed Dive to get there as quickly as possible. The Protect/Deflect Magic prayers reduce the damage taken from standing in the fire, so can be helpful if you're struggling to reach the safe zones in time.
If you're not comfortable with Bladed Dive switching, or if you just want to preserve the inventory space for healing items, an alternate way to deal with the Igneous Rain mechanic is to move close to Zuk, and then step into the narrow segment of the safe zone when it appears. Because Zuk is so large, and his hitbox doesn't extend all the way to the floor, you can run "under" him, getting to the safe zone with little risk of taking damage.
You'll have to move to the safe section of the rain exactly three times. The first safe section will contain an Igneous TzekHaar-Hur (igneous warrior). As before, you'll need to stun him immediately and kill him as soon as possible. If you're fast enough, you'll kill him before the rain pattern changes. The second safe section will contain an Igneous TzekHaar-Xil (igneous ranger). As before, you'll need to use a Threshold immediately and kill him as soon as possible. If you're fast enough, you'll kill him before the rain pattern changes for the last time. The third safe section will contain an Igneous TzekHaar-Mej (igneous mage). As before, you'll need to stand inside his shield immediately and kill him as soon as possible.
After some time, the rain will disappear, and Zuk will start charging up an instakill attack. If you've killed all three of the igneous monsters, you'll be able to interrupt this instakill attack by activating the special action button. His mechanics rotation will now reset. Get the boss down to 100k HP as soon as possible. At 100k HP, the mechanics rotation will reset again, regardless of where you were in the previous rotation. As such, it could occur that you get the Geothermal Burn twice in a row; this is slightly annoying as your Freedom will be on cooldown for the second Geothermal Burn. When I notice this is going to happen to me, I save my Freedom until he applies the second Geothermal Burn. You'll have to eat a bit to tank the damage, but it's very doable.