January 2019
This page was so awesome, it had to be featured on the main page!
This guide explains how you can contribute to the Clan Quest code projects. Note that this is not the only method, since everybody tends to use their own tools and setup, but hopefully it will be enough to get you started.
Contents
Before you can begin
There are a few prerequisites before you can get started with writing code for Clan Quest:
- Be a full member of Clan Quest. While there is nothing preventing non-members from contributing, we do prefer to have a clear way of communication with all contributors.
- Create an account on GitHub. GitHub is a website where code can be shared. It doesn't work like Google Drive or Dropbox in that it just stores the files, it is actually a bit smarter than that. The next section explains this.
- Get in touch with Cireon or Shane who can add you to the Clan Quest organisation on GitHub. This is not required, but it will make it a bit easier to work with our code repositories.
Version management
GitHub is a hub for Git repositories. Git is source control management or version management software. Instead of just saving the latest versions of files, Git actually saves the incremental differences between file versions. This makes it possible to easily revert changes in case you make a mistake, or to see who worked on what. Each of these checkpoints are manually created and referred to as commits. On GitHub, you can browse back all these commits in addition to the latest versions of the files.
Git also allows you to have multiple versions of the code on different branches. A branch is basically its own copy of the code, but with different commits on top of it. Branches can be merged together if you want to keep the changes from both of them going forward.
Approach 1: GitHub Desktop
This is the recommended approach to make contributions to Clan Quest code. GitHub Desktop is an application that allows you to easily download the code from GitHub, make local changes, and upload them again. Go ahead and download the app from the website. Make sure you sign in with the GitHub account you just created when you first open it to get access.
Step 1: Downloading the code
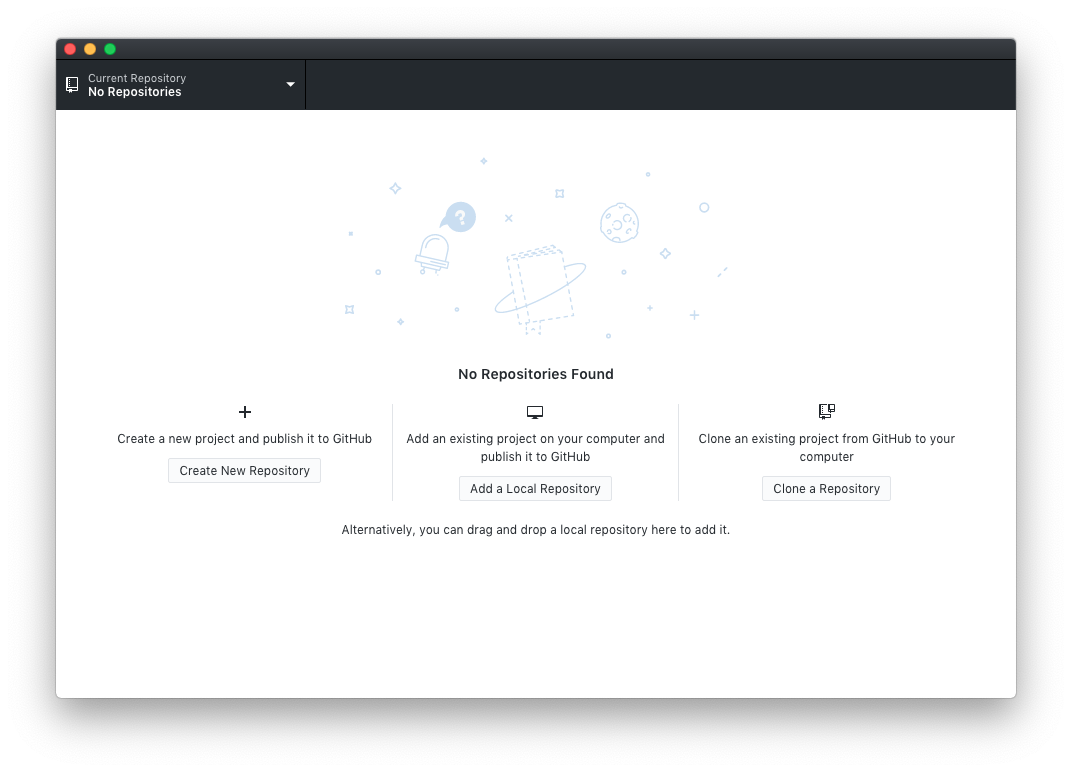
When you first open GitHub Desktop, you will see a screen very much like this:
The first thing we will have to do is to get a copy of the code on your local computer. This is called cloning. Go ahead and click "clone a repository" button. If you can't find the button, a "clone repository" option can also be found in the File menu.
If you were added to the Clan Quest organisation on GitHub, all the Clan Quest code repositories will be visible in the dialog that opens. If you see too many, use the filter option. If you haven't been added to the Clan Quest organisation, you can still add repositories by URL. You can find the names of the different code repositories on our organisation page. For example, for the website repository you would type in clanquest/website.
Choose a local path (it is recommended to keep your code together), and hit the "clone" button to download the code to your device. If you now go to the local directory you selected, you should see a copy of the code.
At this point there may be additional setup you have to do. For example, you may have to install some tools to get the website running, or install dependencies. Code repositories always have a file named README. You can open that file in a text editor to read it, or you can just look at the main page of the repository on GitHub. This file will explain everything you need to do to get the code running. If it does not, don't hesitate to ask one of the other Builders. Once you get your answer, please consider updating the README to make it clearer for the next person.
Step 2: Making changes
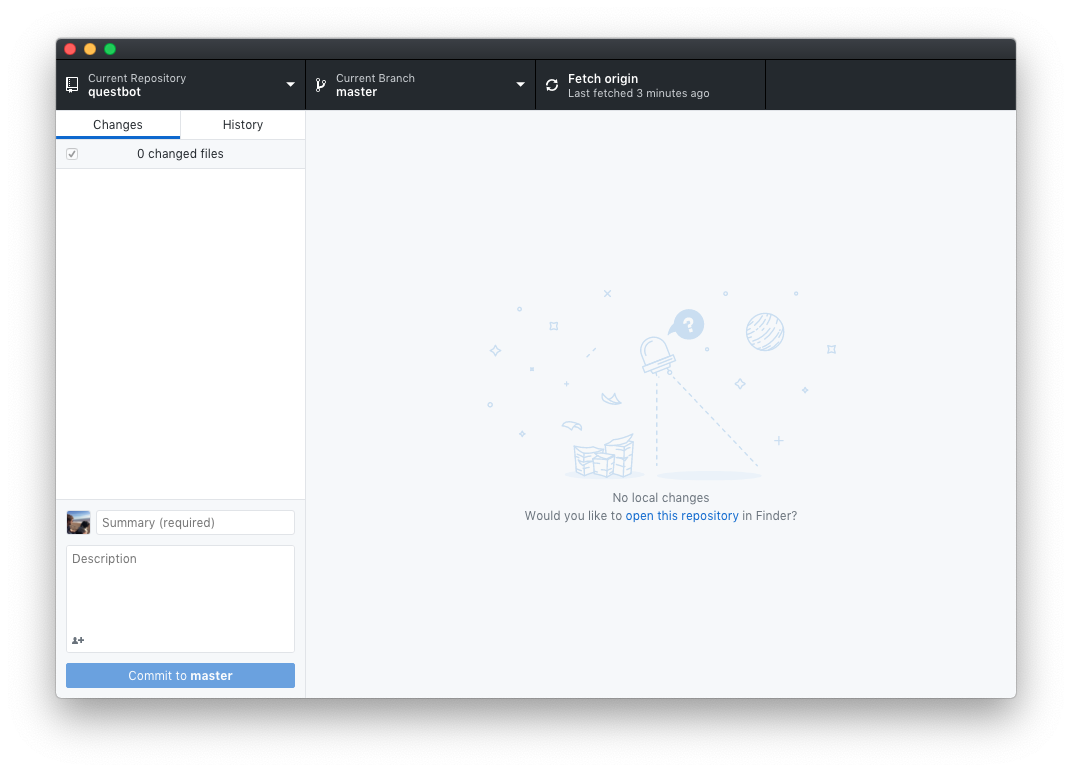
At this point, the GitHub Desktop interface will look something like this:
As explained before, we keep a complete history of all the code, and we even keep multiple versions of it around. What we will do at this point is make a new branch. On this branch we can make changes to our code without affecting other people.
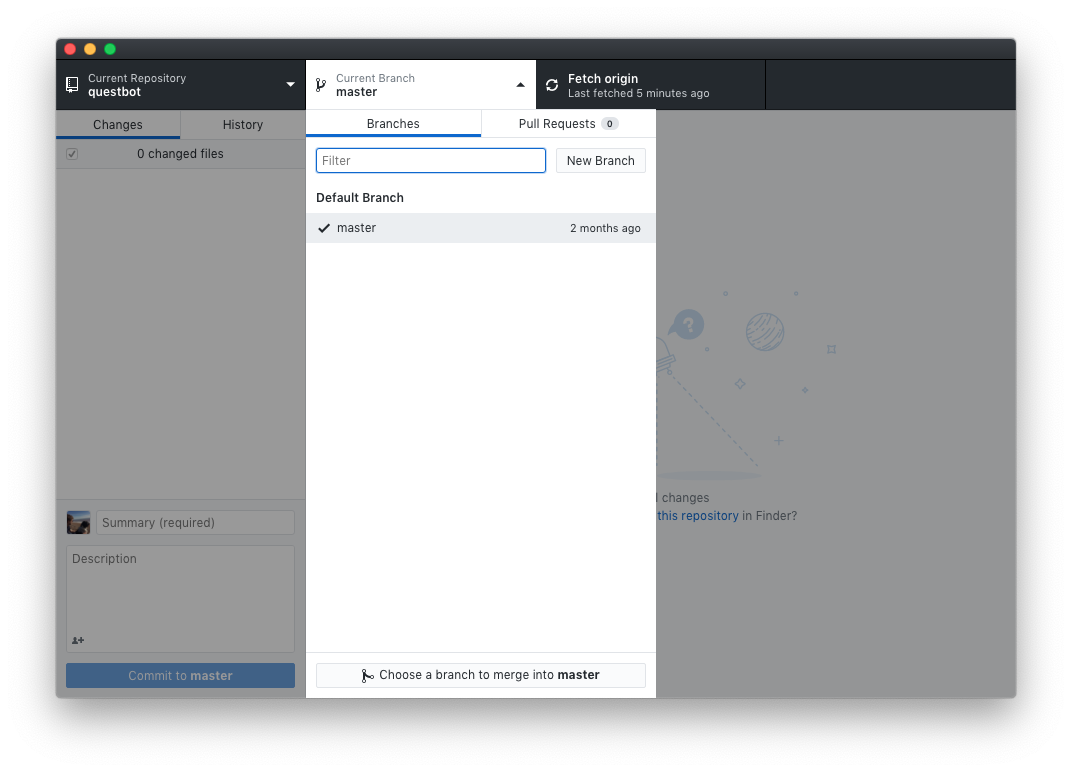
To create a new branch, click the "current branch" block at the top of the application, and then hit the "new branch" button":
Choose a name for your branch. We recommend making it all lower case, and not too long. I will call the branch for this tutorial hello-world. You will see that after creating it, the current branch has updated. You can use this button to switch between branches, and work on several features at the same time.
Now let's make some changes to our code. You do this by using any editor you prefer. Try to only make changes that you really need right now, since all the code will be reviewed. The less code there is to review, the faster it can be done!
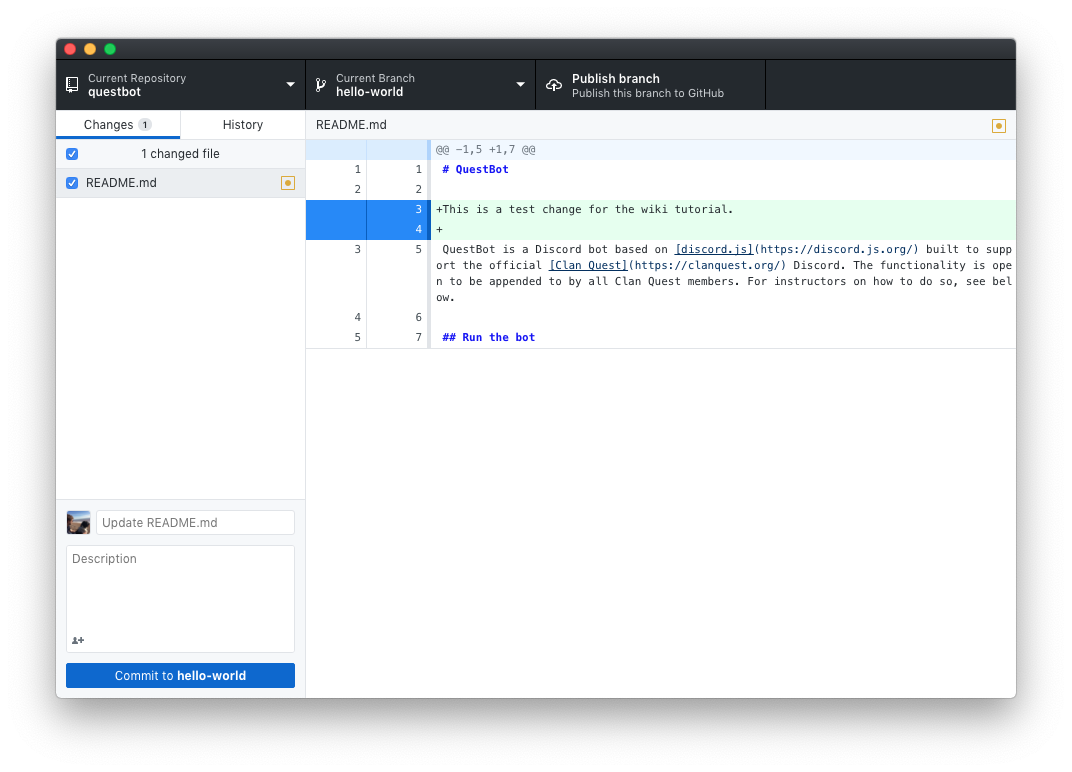
If you go back to GitHub Desktop after making some changes, you will see the changes reflected in the app. This is a great way to review your changes.
Once you have made some progress, you have to commit your changes. A commit is one set of changes in the history of the code repository. Type in a short description that describes your changes, and click the "commit" button. You will see that the changes are no longer shown, because they are now part of the code repository. You can review all the changes in the "history" tab.
Committing code doesn't make it visible online. You can repeat this process of making changes and committing code as often as you want, but when you're ready, it is time to put the code online.
Step 3: Creating a pull request
Once you're happy with your changes, you can click the "publish branch" button in the top. This will send all your code changes back to GitHub. No worries if you click the button too early, you can always make more changes, commit them, and push them. You may even have to do so if your code reviewer asks you to make changes.
Right now the code is still separate from the main code base. Before it can be merged and deployed, it has to be reviewed by one of the code owners. If you go to the repository page on GitHub, it may show you a banner like this:
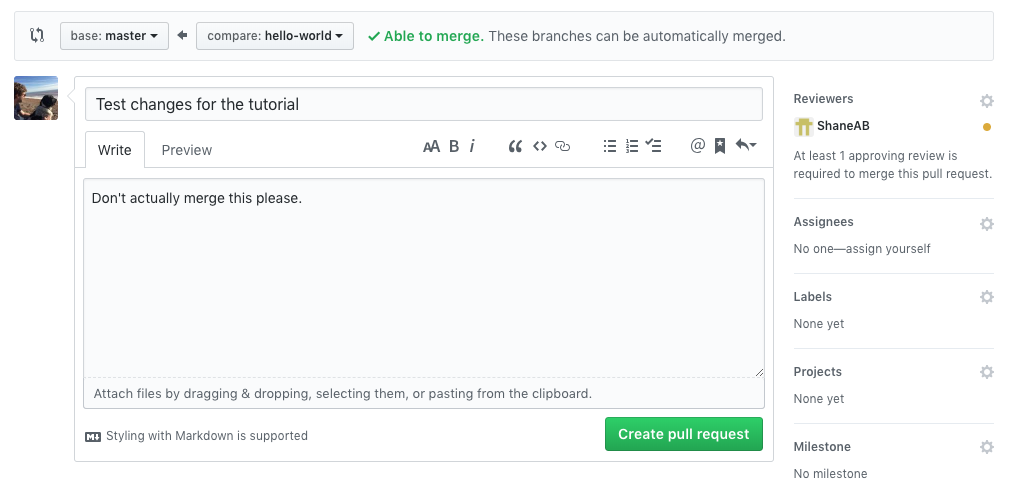
You can immediately create a pull request from here. You can also create a pull request from GitHub Desktop under "Branch" in the file menu, or by manually navigating to the branches page on GitHub and creating a pull request from that.
On the pull request you can review your changes, but more importantly you should fill in the description. If you have multiple commits, summarise the changes, and explain what feature you are adding. Finally, make sure you select a reviewer. There will often be a recommended reviewers, but if not, check the CODEOWNERS file for who you could ask.
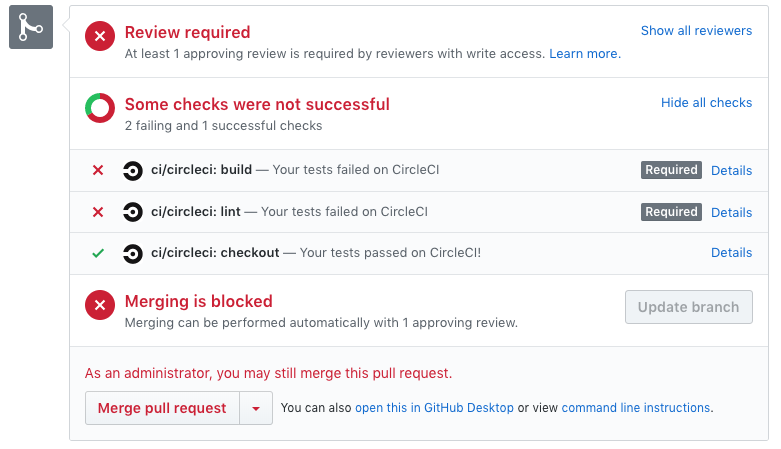
Once the pull request is created, you wait. At the bottom of the pull request overview page, you will find a block like this:
It shows that I need a review before I can merge my code, but it also shows that some of our unit tests and lint processes might be failing. Make sure to fix those! Your reviewer may also ask you for changes. Make the changes, commit, and push. The pull request will automatically be updated and your reviewer notified.
When everything is finally approved, you can do the so called "squash and merge". The technicalities are not important, but this process basically means you are moving the code from your branch to the main branch, after which it can be officially deployed.
Well done! Your code change is now finished.
What next
To make other changes, go back to the master branch in GitHub Desktop. Sometimes other people made changes as well. The button that you used to publish your branch may change into a "pull changes" button. Once you click that, the latest changes will be downloaded and applied to your code.
Sometimes you need to take the changes from the main branch and merge them into your ongoing work. Under the "branch" file menu there will be an "update from master" button that will do just that.
This is just a very quick primer on how to use GitHub Desktop. It is very likely that things won't always work perfectly. There are plenty of tutorials online about Git in general, and I encourage you to take a look. In the end, you need to play around with it to really learn the ins and outs. Don't hesitate to take a shortcut and ask somebody who knows though!
Approach 2: Online editing
GitHub allows people to make changes online in their web browser. This is not a recommended way of making changes, because it is very limited. However, if you want to make really small changes (some text, a colour, etc.), it may be preferable since you don't have to do all the setup for GitHub Desktop.
To make changes, you can browse through the code of all Clan Quest projects from our Clan Quest organisation page. Once you have found the file you want to change, you can click the pencil in the top right to open an editor. Make the changes in the file, and scroll to the bottom once you're done.
On the bottom there will be a little text field where you can describe your change. Make sure to do so, because your code change needs to be reviewed. Select the bottom radio button that creates a new branch, and hit the big accept button. At that point a pull request will be created. See step 3 in the approach above for more information about pull requests.

